


5
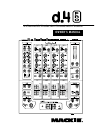
Owner’s Manual
Owner’s Manual
Getting Started
READ THIS PAGE!!
Please read and digest the safety
instructions on page 2, and this page
before you begin using the d.4 Pro
mixer.
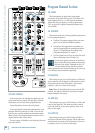
Zero the Controls
1. Turn the rear panel power switch off.
2. Turn down the level and aux controls for mic, pro
-
gram 1, 2, 3 and 4, and center all EQ controls.
3. Set all push button switches to their “out” positions.
4. Set the mic assign switches to off, and program as
-
sign knobs to off.
5. Turn down the level
rotary knobs for main, booth,
zone, and phones.
6. Set the program faders fully down.
7. Center the crossfader.
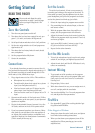
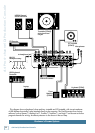
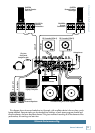
Connections
If you already know how you want to connect the d.4
Pro, go ahead and connect the inputs and outputs up. If
you just want to quickly get sound through the d.4 Pro
mixer and try it out, follow these steps:
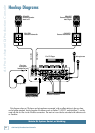
1.
Plug a signal source to the d.4 Pro. This could be a:
• Microphone into a mic input
• Turntable with phono-level output into a phono
input (rear line/phono switch in)
• Line-level source such as a CD player into the
phono input (rear line/phono switch out)
• Line-level source such as a CD player into a CD
input.
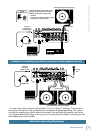
2.
Connect cords from the d.4 Pro’s main outs (XLR or
RCA connectors on the rear panel) to your powered
speakers or amplifier.
3. Plug in the detachable linecord, connect it to a live
AC outlet, and turn on the d.4 Pro’s power switch.
4. If you have powered speakers, turn them on. Other
-
wise, hook up your speakers to the amp and turn it
on. Adjust your powered speaker or amplifier level
controls to however the
manufacturer recommends.
(This is usually all the way up.)
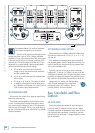
Set the Levels
To set the level controls, it’s not even necessary to
hear what you’re doing at the outputs of the mixer. To
listen while you work, plug headphones into the front
panel headphone jack, press the program’s cue button,
and set the phones level knob up just a little.
1. Select the input using the program source switch.
2. Play something into the selected input, at the nor
-
mal source volume.
3. With the program fader down, there will be no
output, but the program meter will still work.
4. Adjust the channel’s rotary level control so that the
LEDs on the program meter stay around “0” and +6,
and never go higher.
5. Apply some EQ if needed, (return to step 4 if you
do, just to check the levels are still OK).
6. Repeat for the other channels.
Set the Mic Levels
1. To level the microphone input, keep the mic assign
switch off, and sing at your highest expected level.
2. Adjust the mic level until the OL LED above it only
comes on occasionally.
Instant Mixing
1.
To get sound out of the speakers, set the program
assign knob to main, turn up the program fader,
and
slowly
rotate the main level control to a comfortable
listening level.
2. Sing and play. You’re a star!
3. With other channels in use, you can assign one to A,
one to B, and play with the crossfader.
4. You can also add filter X or Y to each program chan
-
nel, and adjust the filter parameters.
FireWire
1. See Appendix E, page 26 for exciting details of get-
ting started with FireWire.
Other Nuggets of Wisdom
• Always turn down the main, booth, zone, and phone
level knobs before making connections.
• When you shut down your equipment, turn off the
amplifiers first. When powering up, turn on the
amplifiers last.