|
10
KeyRIg 49 User Guide
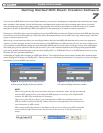
To select an alternate function:
1. PresstheEditModebutton.
2. PresstheblackkeythatrepresentsthefunctionyouwanttoassigntotheOctavebuttons.KeyRig49willexitEdit
mode as soon as you push one of these keys.
PLEASE NOTE: Some of the functions that the Octave buttons can be used for cannot
send out a value less than zero. When used to control these functions, both lights above the
buttons will remain on, regardless of the current setting of that function.
The available functions of the octave buttons are:
Octave Shift
TheOctave“<”and“>”buttonscontroloctaveshiftbydefault.However,ifthesekeyshavebeenprogrammedtocontrol
another function, you may wish to re-assign them to control octave shift once again.
To assign the Octave “<” and “>” buttons to control octave shift:
1. PresstheEditModebutton.
2. PresstheblackkeyaboveC1(C#1),representingDATA=OCTAVE.KeyRig49willexitEditmodeassoonasC#1
has been pressed.
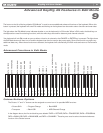
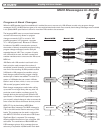
AnothermethodofshiftingKeyRig49’soctavesiswiththeuseoftheblackkeyslabeledOCTAVE“+,”“-,”and“0”onthe
AdvancedFunctionsinEditModediagram.ThisoctaveshiftmethodcanbeusefulwhentheOctavebuttonshavebeen
reassignedtocontrolanotherMIDIfunction.
1. PresstheEditModebutton.
2. PresstheblackkeybelowB2(Bb2).InEditmode,thiskeyfunctionsas“OCTAVE+,”shiftingthekeyboardupone
octave.Itispossibletoshiftthekeyboardupatotaloffouroctaves.
3. PresstheblackkeyaboveF2(F#2).InEditmode,thiskeyfunctionsas“OCTAVE-,”shiftingthekeyboarddownone
octave.Itispossibletoshiftthekeyboarddownatotalofthreeoctaves.
4. PresstheblackkeyaboveG2(G#2).InEditmode,thiskeyfunctionsas“OCTAVE0”toresettheoctaveshifttozero.
5. Whenyouhavechosenyouroctaveshift,eitherpressC5representing“ENTER,”orpresstheEditModebuttontoexit
Editmode.
Transpose
Insomecasesitisusefultoincreaseordecreasethetransmittedpitchbyasmallnumberofsemitonesratherthanawhole
octave.Forexample,youmaybeplayingasongwithasingerandthesingerishavingtroublehittingthehighnotes.Inthis
case,youcantryreducingthepitchbyoneormoresemitones.Thisisachievedusingafunctioncalled“Transpose.”
Transposeworkssimilartooctaveshift,excepttheshiftisnotlimitedtomultiplesof12semi-tones.Aswithoctaveshift,there
aretwowaysoftransposingthekeyboard.WheninEditmode,youcanassigntheOctave“<”and“>”buttonstocontrolthe
transposefeature.Alternatively,youcanusetheblackkeysF#3,G#3,andBb3toshiftthetransposition.Theseblackkeys
represent“TRANSPOSE-,”“TRANSPOSE0”and“TRANSPOSE+”respectively.
To assign the Octave “<” and “>” buttons to transpose:
1. PresstheEditModebutton.
2. PresstheblackkeyaboveD1(D#1),representing“DATA=TRANSPOSE.”KeyRigwillexitEditmodeassoonas
D#1hasbeenpressed.
When the Octave buttons are assigned to transpose the keyboard, the lights above the buttons indicate the direction
ofthetransposition.Toreturnthekeyboard’stransposeshifttozero,pressboththeOctave“<”and“>”buttonsatthe
same time.


