


p.97
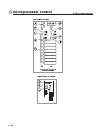
microprocessor control
6
mute scenes
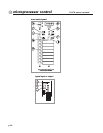
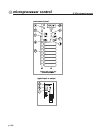
There are 9 possible Scene sources: Manual Mute Scenes 1 thru 8, and the
Micro Scene.The Micro Scene button (G) is the enable switch for the 128
possible Sequenced Scenes.The 8 Manual Mutes are totally independent of
the 128 Sequenced Scenes, giving the system a total of 136 possible mute
patterns. Each of the 136 patterns can consist of any combination of
Channel and Output mutes, all of the 9 possible sources can be combined
to create additional patterns.
Creating a Mute Scene (or Editing an existing one):
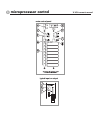
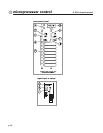
1) Press the Edit Preview button (C), it will begin to blink, indicating that the
system is in Edit Preview Mode.
2) Select a Scene to Edit:The system will automatically choose a Scene to
edit, depending on the status of the system when Edit Preview was selected.
If the system was in Single Scene Mode (switch E depressed), the Mute
Scene that was currently active will be selected to edit. If the system was in
Multiple Scene Mode (switch E not depressed), the Micro Scene will be
automatically selected for editing. If a different Scene than the default is to
be edited, that scene should now be chosen by pressing 1 of the 9 possible
Mute Scene buttons (G & H), it will illuminate to show its selection. Only
one scene can be selected for editing, the condition of the Single Scene but-
ton (E) has no effect in Edit mode.
3) If Micro Scene is selected: If Micro Scene (G) was selected, then the
Up/Down (A) buttons should be used to select the desired Sequenced
Scene (Patch) to be edited.The Display (B) will indicate which of the 128
possible patches is being worked on. Note:When returning to Normal
Mode, the system will revert back to the Patch that was in place before
entering Edit Mode.
4) Assign channels to the Scene:Any channels currently assigned to the
Scene being edited will have their Status LEDs (J) blinking Red. Pressing the
associated Mute Sw (K) will assign / de-assign that channel to the Scene.
5) Clearing a Mute Scene: If you wish to clear all assigned channels from a
Scene, press and hold the Edit Safe (D) button.After a brief delay, the display
will change to CLR?; continue to hold the button down until the display
shows CLRD.All channels assigned to that Scene will be de-assigned and
you can start fresh.
6) Saving your edit: Once you have a Scene configured the way you want it,
either press the blinking Edit Preview (C) button to exit Edit Mode and
return to Normal Mode, or select another Scene to edit by pressing its
associated switch (H), or, if Micro Scene was selected, press the Up/Down
(A) keys to select a new Patch to edit.There is no STORE button to press,
the changes take place immediately while editing, and the Scene is saved
automatically when a new Scene is selected or upon exiting Edit mode.
NOTE:This immediate change will be most apparent when editing a scene
that is currently the active scene (the Mute Scene that was ON when you
entered Edit mode).The Mute LED (L) will change along with the Status
LED (J) as a channel is added or removed from the scene during editing.