


8
<DRB1252>
En/Fr
L
R
L
R
L
R
MASTER
OUT2
R
MASTER
LEVEL
ATT.
SIGNAL
GND
MASTER
OUT 1
PHONO 3 LINE
CH - 4
PHONO 2 LINE
CH - 3
PHONO 1 CD 2 /LINE LINE CD 1 /LINE
CH - 2 CH - 1
CH - 1CH - 2
PLAYER CONTROL
BOOTH
MONITOR
L
RR
RETURN CH - 4 SUBMICSENDREC OUT
LR
1 GND
L
(MONO)
L
(MONO)
L
R
L
R
1
2
3
1
2
3
2 COLD
3 HOT
*4
*5
*6
R L RL
R L
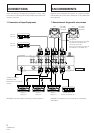
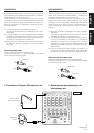
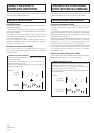
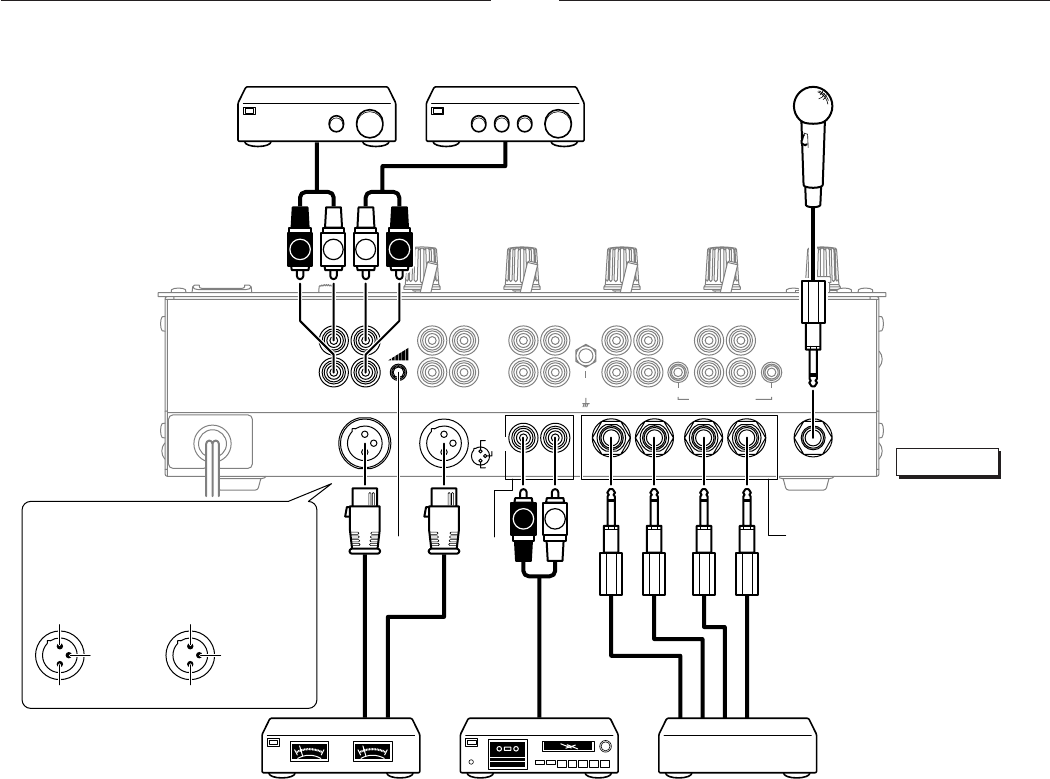
DJM-600
Power amplifier
(Supports RCA input)
Amplificateur de puissance
(Compatible avec entrées RCA)
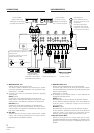
Power amplifier
(For booth monitor)
Amplificateur de puissance
(Pour moniteur de cabine)
Sub-microphone
(CH-4’s PHONO 3 cannot
be used if connecting a sub-
microphone.)
Microphone secondaire
(Le PHONO 3 de CH-4 est
inopérant si vous raccordez
un microphone secondaire.)
XLR terminal polarity is as shown in the
diagram below.
Le schéma ci-dessous montre la
polarité de la borne XLR.
COLD (–)
GND
HOT (+)
Power amplifier
(Supports XLR input)
Amplificateur de puissance
(Compatible avec entrée XLR)
Cassette deck, etc.
Lecteur de cassette, etc...
External effector
Effecteur externe
*4 MASTER LEVEL ATT.
(Master output-level attenuator knob)
This knob is used to decrease the output level to protect
connected amplifiers and speakers from excessive input.
(Attenuation: –∞ to 0dB)
*5 Connect if you want to use another device for adjusting
sound quality.
SEND (output):
Connect this to the external effector’s input terminal.
When using a monaural input effector, connect it to the L
channel output. The effector will receive LR-mixed sound.
RETURN (input):
Connect this to the external effector’s output terminal.
When using a monaural output effector, connect it to the L
channel output. The signals from the effector will be input to
both the L and R channels.
*6 REC OUT.
Outputs sound to the same output source as the master
output, without being influenced by the master volume,
master balance and MONO switches.
CONNECTIONS
RACCORDEMENTS
FROID (–)
TERRE
CHAUD (+)
*4 MASTER LEVEL ATT.
(Bouton principal d’atténuation du niveau de sortie)
Ce bouton sert à diminuer le niveau de sortie afin d’éviter
que les amplificateurs et enceintes raccordés reçoivent des
signaux trop puissants.
(Atténuation: –∞ à 0 dB)
*5 A raccorder si vous voulez utiliser un autre dispositif de
réglage de la qualité sonore.
SEND (sortie):
Raccordez ceci à la borne d’entrée de l’effecteur externe.
Si vous utilisez un effecteur d’entrée mono, raccordez-le à la
sortie du canal L. L’effecteur recevra du son mixé LR
(gauche-droite).
RETURN (entrée):
Raccordez ceci à la borne de sortie de l’effecteur externe.
Si vous utilisez un effecteur de sortie mono, raccordez-le à la
sortie du canal L. Les signaux en provenance de cet
effecteur seront dirigés à la fois vers les canaux L et R.
*6 REC OUT (Sortie REC)
Permet la sortie du son à la même sortie que la sortie
principale (MASTER) sans être affectée par l’opération des
sélecteurs de voluùe principal, d’équilibrage principal et
MONO.