


7
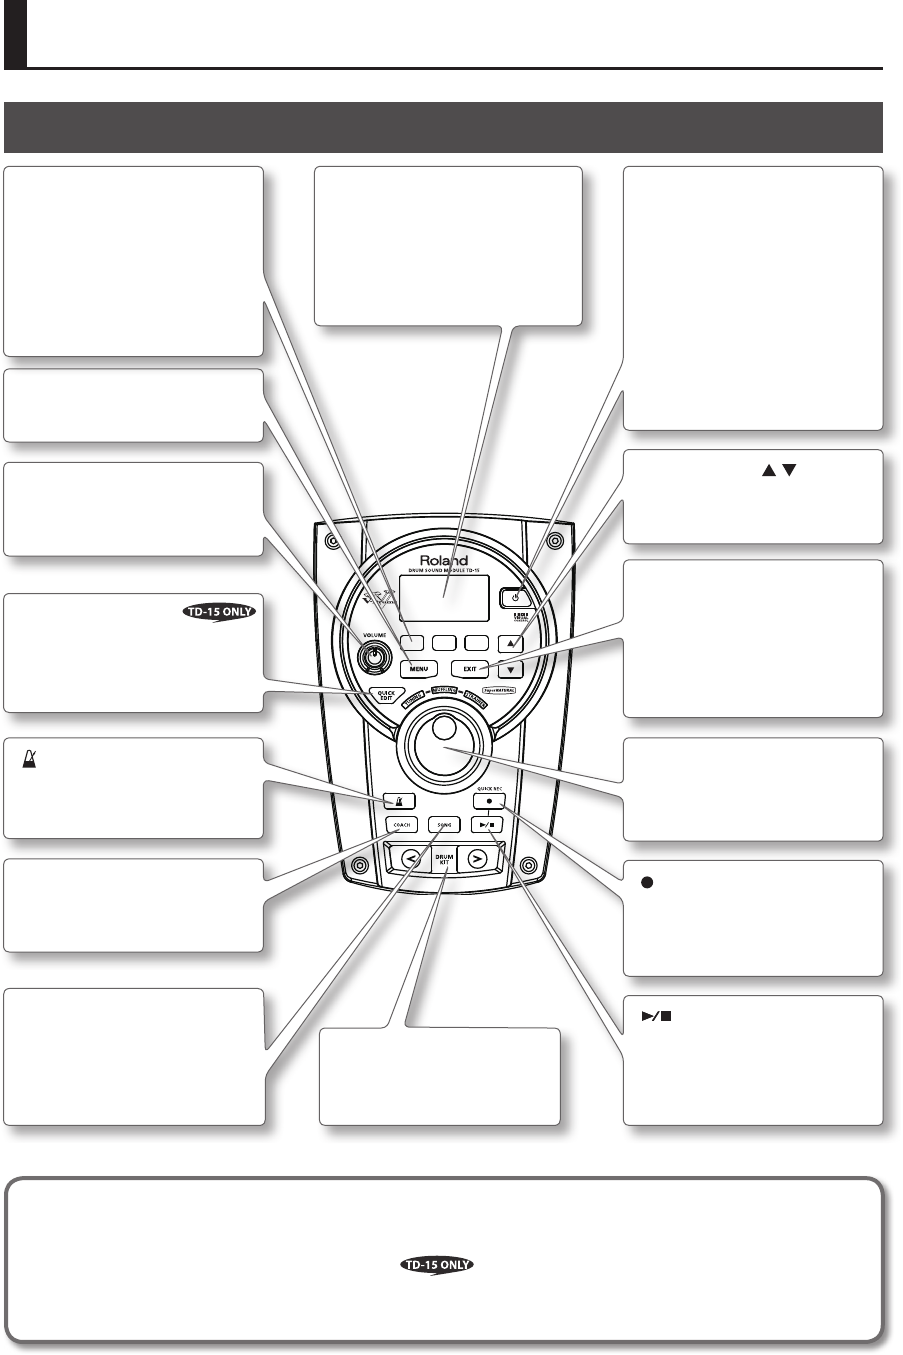
Panel Descriptions
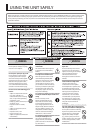
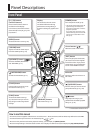
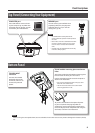
Front Panel
How to read this manual
• This owner’s manual applies to both the TD-15 and the TD-11. These two devices will be collectively referred to as the “TD.”
• Functions found only on the TD-15 are indicated by the
icon.
• Buttons on the panel are enclosed by square brackets [ ]; for example, the [SETUP] button.
• Buttons corresponding to function buttons shown in the display are referred to as (for example) the [F3] (XSTICK) button.
* The illustration shows the TD-15.
Cursor buttons ( / )
Move the cursor in the screen.
[MENU] button
Accesses the menu screen (p. 16).
[QUICK EDIT] button
Switches “TUNING,” “MUFFLING,”
and “STRAINER” (p. 15).
[ ] button
Plays/stops the song or your
performance recorded by QUICK
REC (p. 27, p. 30).
[F1]–[F3] buttons
(function buttons)
Execute the functions shown in
the bottom of the display.
In this manual, we’ll refer to these
(from the left) as the [F1], [F2], and
[F3] buttons.
[VOLUME] knob
Adjusts the volume that’s output
from the OUTPUT jacks (p. 10).
[EXIT] button
Each time you press this button,
you’ll return to the next-highest
level of the screen. If you press it
several times, you will eventually
return to the DRUM KIT screen.
[ ] (METRONOME) button
Sounds the metronome (p. 13).
Value dial
Use this to select drum kits or to
edit values.
Display
This shows the drum kit name
and other information during
performance. During editing, it
shows the settings as graphics and
text.
[ ] (QUICK REC) button
Use this when you want to record
your performance (p. 14, p. 30).
[COACH]
button
Press this when you want to use
the Coach function (p. 31).
[SONG]
button
Accesses the SONG screen (p.
27). Press this when you want to
play songs or make song-related
settings.
[DRUM KIT] buttons
Switch drum kits (p. 11).
[POWER] button
Turns the power on/o (p. 10).
* The TD will automatically power-o
approximately 30 minutes (with
the factory settings) after it was last
played or operated.
If you don’t want the power to turn
o automatically, turn the “Auto O”
setting “OFF” as described in “Auto
O” (p. 35).