


CLP-380 Owner’s Manual
117
Appendix
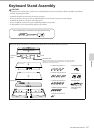
Keyboard Stand Assembly
CAUTION
•Be careful not to confuse parts, and be sure to install all parts in the correct direction. Please assemble in accordance
with the sequence given below.
•Assembly should be carried out by at least two persons.
•Be sure to use the correct screw size, as indicated below. Use of incorrect screws can cause damage.
•Assemble the stand on a flat floor with ample space.
•Be sure to tighten up all screws upon completing assembly of each unit.
•To disassemble, reverse the assembly sequence given below.
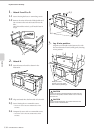
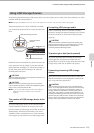
Remove all parts from the box. Confirm that all parts shown in the illustration are provided.
Have a Phillips-head (+) screwdriver of the appropriate size ready.
A
B
C
D
EF
Connector
panel
AC IN
Styrofoam pads
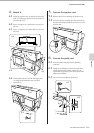
Take out the styrofoam pads, and place A on top of the pads.
Position the styrofoam pads to protect the connector panel at
the bottom of A and the AC IN.
6 x 25mm long screws x 4
Pedal cord
6 x 16mm short screws x 6
4 x 14mm thin screws x 8
4 x 20mm tapping screws x 5
4 x 10mm thin screws x 2
Cord holders x 2
Headphone hanger
AC power cord
(The shape of plug
differs depending
on locale.)