


45
Music Disk Recorde
r
6
MUSIC DISK RECORDER
PAUSE STOP PLAY SONG SELECT RECORD CUSTOM PLAY
FORMATTEMPO
CONTROLPEDALLOWERUPPERCONTROLPEDALLOWERUPPER
RECORD PLAY
SHIFT
SONG DEL.TOFROMSONG
REPEAT
SONG COPY
MUSIC DISK RECORDER
PAUSE STOP PLAY SONG SELECT RECORD CUSTOM PLAY
FORMATTEMPO
CONTROLPEDALLOWERUPPERCONTROLPEDALLOWERUPPER
RECORD PLAY
SHIFT
SONG DEL.TOFROMSONG
REPEAT
SONG COPY
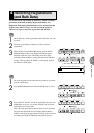
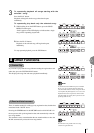
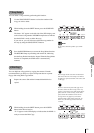
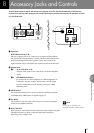
7) Song Delete
You can delete a song on disk by performing this function.
1
Use the SONG SELECT buttons to select the number of the
song you wish to delete.
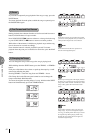
2
While holding down the SHIFT button, press the SONG DEL.
button.
The letters “dL” appear on the left side of the LED display, next
to the selected song number. RECORD lamp flashes to indicate
that the M.D.R. is ready to delete the song.
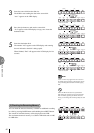
If you wish to, you can still select a different song number in
this step by using the SONG SELECT buttons.
NOTE:
If you want to abort the operation, press STOP
button.
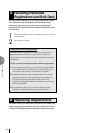
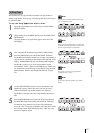
3
Press the RECORD button to execute the Song Delete function.
The RECORD lamp stops flashing and remains lit, indicating
that the Song Delete function has begun. When the Song Delete
function is completed, the STOP status is automatically
resumed.
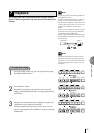
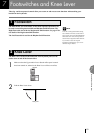
8) Disk Copy
You can duplicate a floppy disk by copying the contents. Yamaha
recommends that you keep two copies of important data on separate
floppy disks using Disk copy function.
1
Prepare the source disk and the formatted blank disk to be
copied.
The disk type of both source disk and destination
disk must be the same. For example, use 2HD for
the disk to be copied (destination) if the source disk
is 2HD type.
Be sure to set the Write-protect tab (page 29) on
the source disk to ON. The message “Prot” may
appear if you insert the source disk with the Write-
protect tab “off.” On the contrary, set the Write-
protect tab on the destination disk to off. The
message “Prot” may appear if you insert the
destination disk with the Write-protect tab “on.”
In this case, the Disk Copy function cannot be
executed.
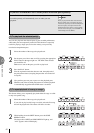
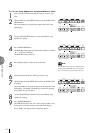
2
While holding down the SHIFT button, press the LOWER
button in the Record section.
“In 1” appears on the LED display to indicate that the M.D.R. is
ready to execute the Disk Copy.