


Other functions
Owner’s Manual
45
Other functions
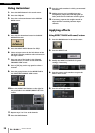
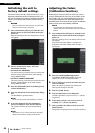
Adjusting the brightness of
the touch screen, lamps, and
other indicators
This operation lets you adjust the brightness of the touch
screen, top panel LEDs, channel name displays, and
lamps connected to the rear panel LAMP connectors.
1. In the function access area, press the SETUP
button.
2. In the field located in the bottom row of the
SETUP screen, press the BANK A or BANK B
button.
You can save two different brightness settings in
bank A and B, and switch between them if desired.
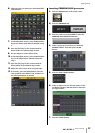
3. Use the [TOUCH AND TURN] knob to set the
following parameters.
CONTRAST field
•NAME
This knob adjusts the contrast of the characters of
the channel name displays on the top panel.
BRIGHTNESS field
•NAME
This knob adjusts the brightness of the channel
name displays on the top panel.
•CH COLOR
This knob sets the brightness balance of the
channel color indicator and the channel name
display on the top panel.
•SCREEN
This knob adjusts the brightness of the touch
screen.
If you have set the brightness to lower than level 2,
the QL will start up next time with a brightness
setting of 2 so that you will be able to see the
screen.
•PANEL
This knob adjusts the brightness of the top panel
LEDs.
•LAMP
This knob adjusts the brightness of the lamps
connected to the rear panel LAMP jacks.
4. If desired, switch between banks A/B and make
settings for the other bank in the same way.
Now you can switch between the BANK A and
BANK B buttons to change the brightness of the
touch screen, LCD, channel name displays, and
lamps in a single operation. You can also assign this
parameter to a USER DEFINED key (see the
Reference Manual), and press that key to switch
between banks A and B.
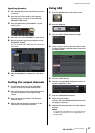
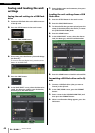
Setting the date and time of
the internal clock
This section explains how to set the date and time of the
clock built into the QL unit, and how to select a date and
time display format. The date and time you specify here
are used for the time stamp used when saving a scene.
1. In the function access area, press the SETUP
button.
2. Press the DATE/TIME button at the lower part of
the SETUP screen.
The DATE/TIME display appears.
•DATE
This field specifies the date of the internal clock.
•TIME
This field specifies the time of the internal clock.
•DISPLAY FORMAT
This field specifies the format in which the date and
time of the internal clock are displayed.
Date
MM/DD/YYYY (Month/Day/Year)
DD/MM/YYYY (Day/Month/Year)
YYYY/MM/DD (Year/Month/Day)
Time
24Hours (hours shown in the range of 0–23)
12Hours (hours shown from 0am–11am, and
0pm–11pm)
3. In the FORMAT field, press the MODE buttons
several times to select the desired format for
date and time display.
4. Use the [TOUCH AND TURN] knob to set the
current date and time.
5. When you have finished making settings, press
the OK button.
The date, time, and display format you specified
will be finalized, and the window will close. If you
press the CANCEL button or the X symbol instead
of the OK button, your changes will be discarded
and the window will close.