


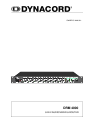
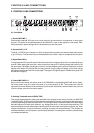
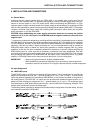
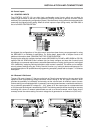


6, Tone Control LO / HI
Each of the four MIC/LINE as well as each of the four AUX inputs has its own tone control section, which
allows individually amplifying/attenuating the treble (HI) and bass (LO) by +/-15 dB. Turning the tone
controls clockwise amplifies the corresponding frequency range, while turning them counterclockwise
results in attenuating the corresponding frequency range. Avoid extreme settings. Generally, minor
corrections of the input sound signal will achieve the best result as well as the most natural sound. The
controls are recessed-mounted and can only be accessed via screwdriver, to prevent faulty operation.
7, Control AUX 1-4
Rotary controls for setting the volume level of the DRM4000’s corresponding AUX inputs. Ideally, the
rotary control is set to a value in the area of its center position (0 dB). This provides you with the opportunity
to match different levels of different input channels. Afterwards, use the master rotary controls to set the
output volume for the entire system.
8, Ducking controls A / B
These controls allow setting a value in dB by which the audio signals of the non-prioritized input channels
(e.g. background music) is attenuated when the ducking function is active. Separately setting the ducking
depth (attenuation rate) for the outputs A and B to any value between 0 dB (clockwise margin) and -40
dB (counterclockwise margin) is possible. The ducking controls are recessed-mounted and can only be
accessed via screwdriver, to prevent faulty operation.
9, Ducking indicators A / B
A lit ducking-LED indicates that the ducking function of the corresponding channel has been activated. In
other words, the audio signal of a prioritized channel (MIC/LINE 1 or 2) is connected through while the
signals of all other channels (e.g. background music) are attenuated.
10, Control MASTER A / B
These volume controls of the two main outputs Master A and B allow matching the output level of the
DRM 4000 to the input level of consecutive equipment - e.g. power amps or the DPM 4000. In this way
they are used to set the overall volume. Generally, setting the controls to their center position (0 dB) will
provide good results. If a different output level is needed, amplifying the signal by +6 dB (clockwise margin)
or attenuating the signal by any amount (counterclockwise margin) is possible.
11, LED-chain Meters A / B
The two 5-segment LED-chains indicate the actual audio signal level at the MASTER-outputs A and B in
steps of 10 dB within an indication range of 40 dB; the indicators signal the individual levels at the outputs
OUT A and OUT B in dBu. To prevent the occurrence of distortion, set the output levels of the DRM 4000
so that at the highest signal peaks the top LED’s of the chains are not lit (+20 dBu).
12, POWER-switch
Use this switch to switch the power of the DRM4000 on or off.
13, ON-LED
The ON-LED lights when the DRM4000’s power is switched on.
CONTROLS AND CONNECTIONS
2-2