38 Pelco Manual C586M (9/99)
PROGRAMMING A PRESET
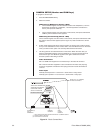
1. Press the MAIN or SPOT MONITOR key. The green LED over the MAIN or SPOT key
lights. When using the MAIN MONITOR, the SPOT MONITOR DISPLAY menu item in
the Advanced System Setup menu must be set to TRACK MAIN (refer to the
Advanced System Setup
section).
2. Select the camera.
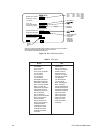
Addressing by Multiplexer (Switch 7 OFF)
a. On the number pad, press the address number of the multiplexer (1-16 if the
keyboard is connected to a multiplexer; 1-8 if the keyboard is connected to a
server), then press the UNIT key. The LED displays the address.
b. On the number keypad press the number of the camera (1-16), then press the
CAM key.
Addressing Consecutively (Switch 7 ON)
On the number keypad press the number of the camera, then press the CAM
key. Refer to Table D for camera numbers.
3. Position the camera.
4. On the number keypad press the number of the preset, then hold down the
PRESET key for five seconds.
PROGRAMMING A PATTERN
1. Press the MAIN or SPOT MONITOR key. The green LED over the MAIN or SPOT key
lights. When using the MAIN MONITOR, the SPOT MONITOR DISPLAY menu item in
the Advanced System Setup menu must be set to TRACK MAIN (refer to the
Advanced System Setup
section).
2. Select the camera.
Addressing by Multiplexer (Switch 7 OFF)
a. On the number pad, press the address number of the multiplexer (1-16 if the
keyboard is connected to a multiplexer; 1-8 if the keyboard is connected to a
server), then press the UNIT key. The LED displays the address.
b. On the number keypad press the number of the camera (1-16), then press the
CAM key.
Addressing Consecutively (Switch 7 ON)
On the number keypad press the number of the camera, then press the CAM key.
Refer to Table D for camera numbers.
3. On the number keypad press 1 for pattern 1, 2 for pattern 2, or 3 for pattern 3. Then
hold down the PATTERN key until the message PROGRAMMING PATTERN appears
on the screen.
4. Move the camera through the pattern.
5. To stop programming the pattern, on the number keypad press 1 for pattern 1, 2 for
pattern 2, or 3 for pattern 3. The message PROGRAMMING PATTERN goes away.
NOTE:
The LEDs above
the camera buttons on the
multiplexer will illuminate to
indicate which cameras are
being displayed.
NOTE:
Refer to your pan
and tilt system manual for
pattern duration lengths.
For those systems having
three programmable
patterns, it should be noted
that you can only program
one long
or
two short
patterns:
Pattern 1–Long Pattern
Pattern 2–Short Pattern
Pattern 3–Short Pattern
If you need two patterns,
you must program the short
patterns 2 and 3 only. If you
need the long pattern, you
can program pattern 1
only
.
If you try to program a long
and short pattern, you will
always
lose one of the two
patterns.