


BASIC OPERATIONS
14
En
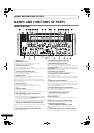
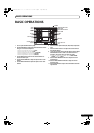
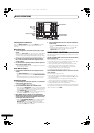
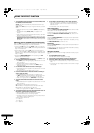
Selecting Stereo or Monaural
When the MONO/STEREO switch is set to [MONO], the audio
master output becomes a monaural combination of L+R
channels.
Microphone Input
1 To use a microphone, set the MIC switch to [ON] or [TALK
OVER].
When set to [
TALK OVER
], any time a sound of –15 dB (default
setting) or more is input, all sound sources other than the
microphone are attenuated by 20 dB (default setting). These
default values can be changed in the hardware setup (P. 42).
2 Use the MIC 1 LEVEL dial to adjust the sound volume of
MIC 1, and use the MIC 2 LEVEL dial to adjust the sound
volume of MIC 2.
3 Use the microphone equalizer dials (HI, LOW) to adjust the
tone of the microphone sound.
•The microphone equalizer function operates simultaneously
on microphone 1 and 2.
Booth Monitor Output
1 Use the BOOTH MONITOR level dial to adjust the sound
volume.
•The
BOOTH MONITOR
level dial can be used to adjust the
sound volume independently of the AUDIO MASTER LEVEL
dial.
•Use the hardware setup (P. 42) to set whether or not the
microphone sound is to be output to the booth monitor.
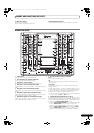
Headphones Output
1 Use the headphone CUE buttons (channels 1 to 4, MASTER,
EFFECT CUE) to select the source.
•The selected
CUE
button lights brightly.
2 Set the HEADPHONES (MONO SPLIT/STEREO) switch.
• When set to the [MONO SPLIT] position, the sound selected
with the headphone
CUE
button is output to the left channel,
and the master sound is output to the right channel (only
when MASTER CUE button is set to ON).
• When set to the [STEREO] position, the sound selected with
the headphone
CUE
button is output in stereo.
3 When [MONO SPLIT] is selected, use the HEADPHONES
MIXING dial to adjust the balance of sound between the left
channel (sound selected with the headphone CUE button),
and the right channel (master sound).
• When the
HEADPHONES MIXING
dial is rotated clockwise
(toward [MASTER]), the master output (only when the
MASTER CUE button is ON) increases; when rotated
counterclockwise (toward [
CUE
]), the sound selected with
the headphone
CUE
button increases.
4 Use the HEADPHONES LEVEL dial to adjust the headphones’
sound volume.
• Rotate the HEADPHONES LEVEL dial to adjust the sound
level.
• When the Effect mode select button (P. 17) is set to [V]
mode, effect sounds will not be output even if the
EFFECT CUE button is pressed.
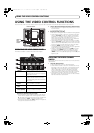
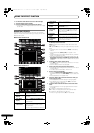
FADER CURVE SELECTION
The response of sound volume change to the fader control can be
set in three types.
Use the CH FADER CURVE switch to select the desired channel
fader response curve.
The sound volume and video level changes as follows:
• At the left setting, the curve operates to produce a rapid rise as
the channel fader approaches its distant position.
• At the right setting, the curve operates to produce an even,
neutral rise throughout the channel fader’s movement.
• At the middle setting, an intermediate curve is produced,
midway between the two curves noted above.
• This setting applies equally to channels 1 to 4.
Use the CROSS FADER CURVE switch to select the cross fader
curve response.
Sound volume changes as follows:
• At the left setting, the curve produces a rapid signal rise. (As
soon as the cross fader lever leaves the [A] side, the [B] channel
sound is produced.)
•
At the right
setting, the curve operates to produce an even,
neutral rise throughout the cross fader’s movement.
• At the middle setting, an intermediate curve is produced,
midway between the two curves noted above.
• This setting produces equal curve effects for both sides A and B.
The video level is as noted above only when the video cross fader’s
video mix effect is set to [FADE].
HI
0
9
8
7
6
5
4
3
2
1
0
0
9
8
7
6
5
4
3
2
1
0
MONO/STEREO
CUE
LEVEL
BOOTH MONITOR
CH FADER CURVE
CROSS FADER CURVE
MIC
HI, LOW
MIC1 LEVEL
MIC2 LEVEL
MIXING
MONO SPLIT/STEREO
SVM-1000_B_En.book 14 ページ 2007年11月26日 月曜日 午後12時54分