


NAMES AND FUNCTIONS OF PARTS
9
En
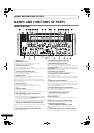
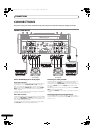
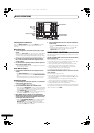
35 Master level indicator (MASTER L, R)
These segment indicators display the audio output level from L and
R channels. The indicators have a two-second peak hold.
36 Master balance dial (BALANCE)
Use to adjust the L/R channel balance for audio master output,
booth monitor output, recording output, and digital output.
37 BOOTH MONITOR level control dial
This dial is used to adjust the booth monitor output volume.
The volume can be adjusted independently of the master output
level. (Adjustable range: –∞ to 0 dB)
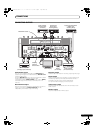
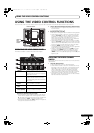
38 Channel fader curve switch (CH FADER CURVE)
This switch allows the user to select from three types of channel
fader curve response.
The sound volume and video level changes as follows:
This setting is applied equally to channels 1 to 4.
• At the left setting, the curve operates to produce a rapid rise as
the channel fader approaches its distant position.
• At the right setting, the curve operates to produce an even,
neutral rise throughout the channel fader’s movement.
• At the middle setting, an intermediate curve is produced,
midway between the two curves noted above.
39 SD CARD slot
Insert an SD card.
40 UTILITY button (MASTER MONITOR, SET UP)
Switches between display / no display of the master monitor on the
LCD. When the master monitor is set to display, the indicator
lights. When the button is held depressed, the indicator changes
to flashing, and the LCD screen changes to show the utility setup
menu.
41 VIDEO EQ button (ON/OFF, SET UP)
Switches the video equalizer ON/OFF. The indicator lights when
the video equalizer is ON. When the button is held depressed, the
indicator flashes, and the LCD display changes to show the
equalizer setup menu.
42 JPEG VIEWER button
Use to set the JPEG viewer mode. The indicator lights when in the
JPEG viewer mode.
43 VIDEO SOLO MODE button
Use to switch the video solo mode ON/OFF. When the video solo
mode is ON, the indicator will flash.
44 Fader AV synchro button (FADER AV SYNC)
This button determines whether sound and video are controlled
together, or independently. When set to ON, the indicator lights,
and the channel fader and cross fader operations change both
sound and video simultaneously. When set to OFF, the channel
fader and cross fader levers control sound only, while video is
controlled by the touch panel.
45 Effect channel selector dial (CH SELECT)
Use to select the channel to which effects are applied. When [MIC]
is selected, effects are applied to both microphone 1 and
microphone 2.
46 VIDEO FX PATTERN/TEXT BANK dial
Use to select video effects, video effect patterns and text banks.
47 Effect parameter 1 dial (TIME/PARAMETER)
Adjusts parameter for selected effect.
•If this dial is rotated while depressing the TAP button, direct
BPM can be set manually.
48 Effect parameter 2 dial (LEVEL/DEPTH)
Adjusts quantitative parameters for selected effect.
49
TAP
button
The BPM is calculated from the intervals at which the TAP button
is struck.
50 Effect button/indicator (EFFECT ON/OFF)
Turns selected effect ON/OFF.
When power is turned ON, the button lights (defaults to effect
OFF). When effects are enabled (ON), the button flashes.
51 Cross fader lever (A/B)
This adjusts sound and video levels assigned to sides [A] and [B]
in accordance with the CROSS FADER ASSIGN switches. When
FADER AV SYNC is OFF, the control adjusts the sound only.
SVM-1000_B_En.book 9 ページ 2007年11月26日 月曜日 午後12時54分