


24
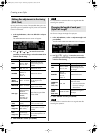
Creating a song
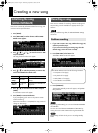
You can use the Prelude’s 16-track recorder to create songs.
You can record your keyboard performance while listening to
an accompaniment, and then listen to the playback of your
recorded performance.
If you want to record the Style playback as well, turn [STYLE]
on.
Recording will start/stop simultaneously when you start/stop
the Style.
If you want to record only your keyboard performance without
playing a Style, turn [SONG] on.
If [STYLE] and [SONG] are both turned off, the rhythm pattern
of the Style selected by the STYLE SELECT buttons will be
recorded together with the keyboard performance.
Recorded performances are discarded when another Song is
selected, or when the power is turned off. If you don’t want to
lose the Song, you must save it (p. 27).
Song settings (e.g., tempo and time signature) are determined
by the settings of the Style that’s saved in the selected
Performance. You’ll probably find it convenient to first select
the Style and Tones that you want to use (p. 38 in owner’s
manual). If you are performing without using a Style, you can
specify the tempo and time signature of the Song in the SONG
TRACK screen (see below).
1. Select the Performance that you want to use (p. 36 in the
owner’s manual).
2. Press [SONG REC].
[SONG REC] will blink.
3. Press [ ] to start recording.
4. Perform.
5. Press [ ] to stop recording.
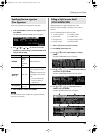
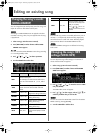
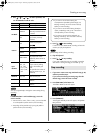
When you stop recording, the SONG TRACK screen will
appear.
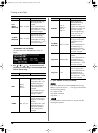
1. Song Name
2. Part: Part to record
3. The Tone number for each Part
4. Move the cursor here and press [ENTER] to move to a
different screen.
MFX: SONG MFX screen (p. 26)
EDIT: SONG EDIT screen (p. 32)
MICRO: SONG MICROSCOPE screen (p. 39)
MASTER: SONG MASTER TRACK screen (p. 41)
INIT: SONG INITIALIZE screen (p. 28)
5. MUTE:
Mute On (no sound) or Off (sound) setting for each Part
6. SOLO:
Solo On (hear only this part) or Off setting for each Part
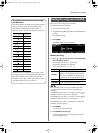
7. Recording parts
A performance you record using a Style is recorded to
parts 1–16 as follows.
When you record a performance, part 4 and part 11 are
recorded as the manually played Upper part and
manually played Lower part, respectively.
In this case, the part number indication at the bottom of
the SONG TRACK screen will indicate “UPR” and “LWR”
for Part 4 and Part 11, respectively.
6. Press [EXIT] to return to the Main screen.
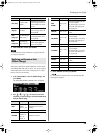
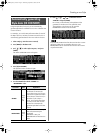
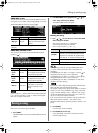
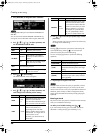
Recording your performance
as you play
Track Part Name Track Part Name
1 Accomp 1 9 Accomp 6
2 Accomp bass 10 Accomp drums
3 Accomp 2 11 Lower Part
4 Upper Part 12
5 Accomp 3 13
6 14
7 Accomp 4 15 Melody Intelligence
8 Accomp 5 16
1
2
3
5
6
7
4
Prelude_OM_Ver2.book Page 24 Wednesday, September 9, 2009 5:38 PM