


10
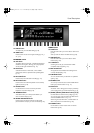
Panel Descriptions
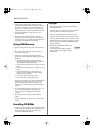
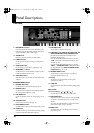
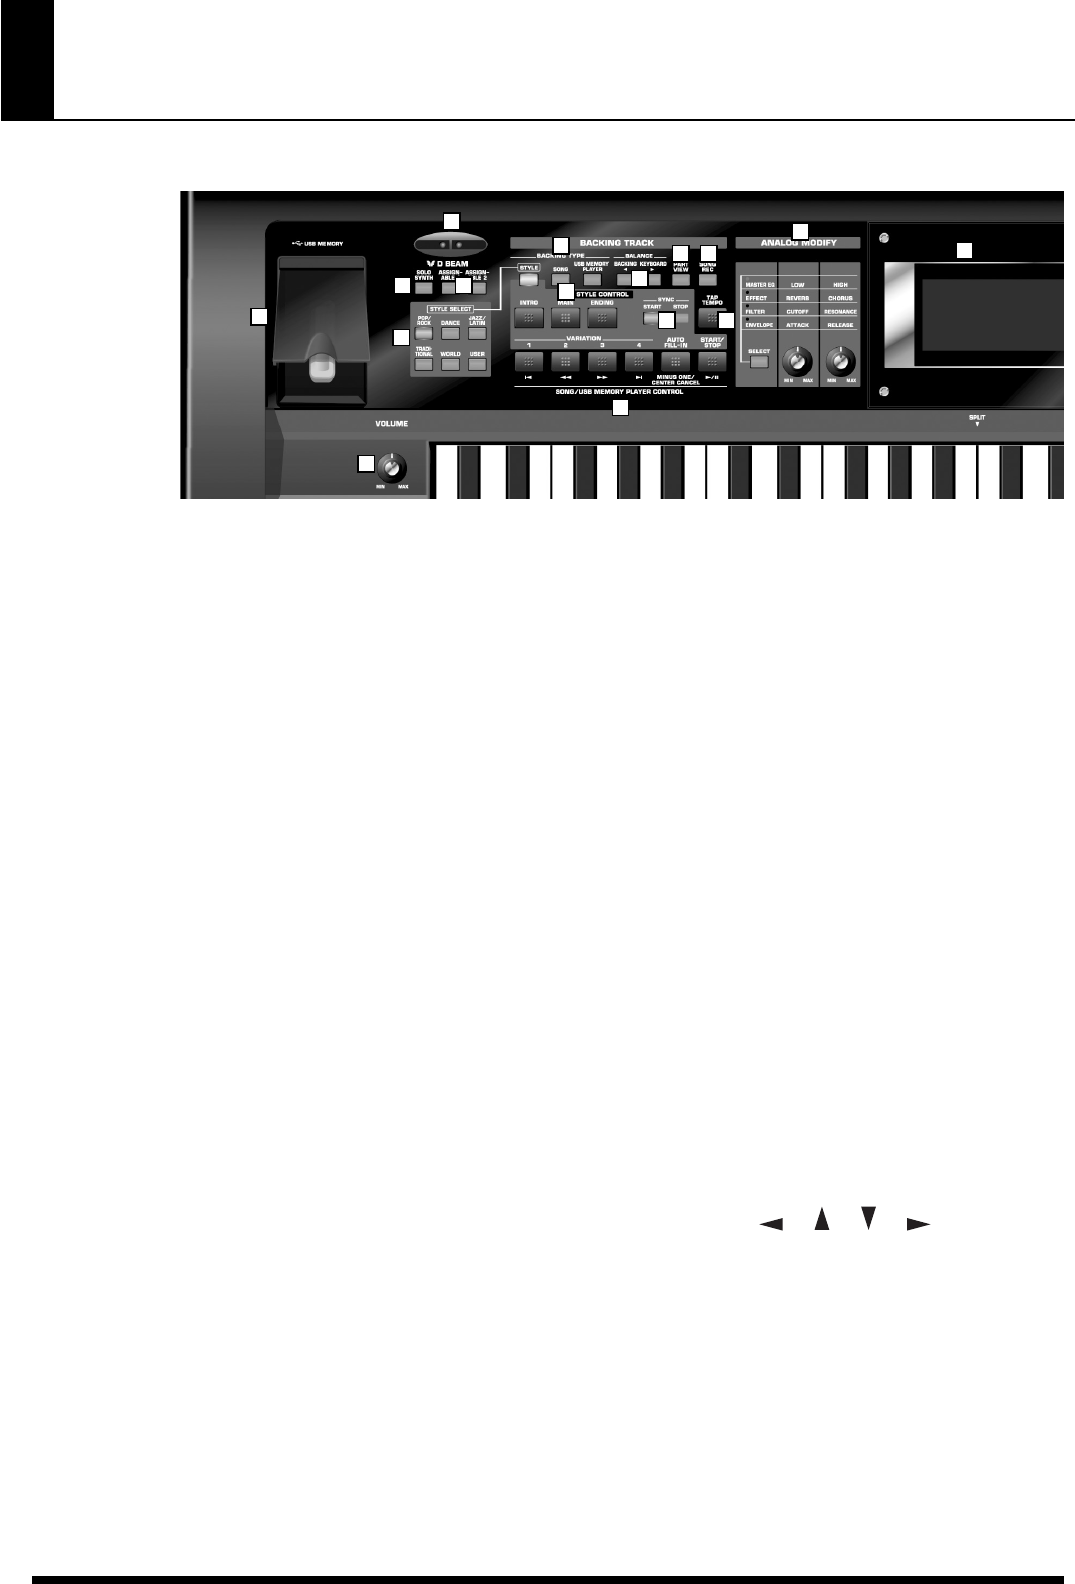
Front Panel
1.
USB MEMORY connector
Connect a USB memory here and use the GW-8 to play
back files (songs) that have been stored on USB memory.
You can also back up data to USB memory.
2.
VOLUME knob
This knob controls the volume of the entire GW-8.
3.
D BEAM controller
Use this controller simply by moving your hand above it
(p. 34).
4.
SOLO SYNTH button
Play the GW-8 as a monophonic synthesizer (p. 34).
5.
ASSIGNABLE 1/2 buttons
Use these buttons to turn the D Beam controller on/off, or
to select the D Beam function (p. 35).
6.
STYLE SELECT buttons
These buttons allow you to select one of the twelve Style
categories.
BACKING TRACK section
7.
BACKING TYPE buttons
Use these buttons to select the backing type (p. 24).
8.
BALANCE buttons
Use these buttons to adjust the volume balance between
the backing and the keyboard. (p. 24)
9.
PART VIEW button
Use this to adjust the volume, etc. of each part (p. 25, p.
28).
10.
SONG REC button
Press this button to record a Song (p. 27).
11.
STYLE CONTROL buttons
Use these buttons to select the desired Style pattern (p. 25).
12.
SYNC buttons
These buttons allow you to start/stop the Style by playing
a note in the left side of the keyboard (p. 26).
13.
TAP TEMPO button
Use this button to set the tempo (p. 24).
14.
VARIATION [1]–[4], AUTO FILL-IN, START/STOP, and
SONG/USB MEMORY PLAYER CONTROL buttons
The operation of these buttons will depend on the
BACKING TYPE buttons (7).
If you’ve used the BACKING TYPE buttons (7) to select
“
STYLE
,” these buttons will start/stop the Style or select
variations (p. 25).
If you’ve used the BACKING TYPE buttons (7) to select
“
SONG
” or “
USB MEMORY PLAYER
,” these buttons control
the song playback as the
SONG/USB MEMORY PLAYER
CONTROL buttons
(p. 30, p. 32).
15.
ANALOG MODIFY section
Turn the knobs to control the functions you select by
pressing the SELECT button (p. 37).
16.
Display
This displays various information according to the
operations you perform.
17.
VALUE dial
Use this to edit the value of the parameters (settings) in the
screen.
EDIT section
18.
Cursor buttons ([ ] [ ] [ ] [ ])
Use these buttons to move the cursor in the screen.
19.
EXIT/ENTER buttons
Pressed to issue the “Cancel” (EXIT) or “
Execute
” (ENTER)
commands in screens that prompt you to make such a
selection.
You’ll also use the ENTER button to access lists of Tones,
Performances, Styles, Songs, or Favorites.
20.
MENU button
This button takes you to the settings screen for various
parameters (p. 46).
1
2
3
45
6
7
8
9
10
11
12 13
14
15
16
GW-8_e.book 10 ページ 2008年4月1日 火曜日 午前11時44分