


25
Backing Track Functions
1.
Press [STYLE] so the button is lit.
At this time, the keyboard Split Point will be set to C4.
If you press and hold [SPLIT] (for approximately two seconds),
the Split Point setting screen will appear. You can turn the
VALUE dial to change the Split Point. When you’re finished,
press [EXIT].
2.
Press [START/STOP]; the backing will start playing.
If [STYLE] is unlit, pressing [START/STOP] will cause only the
drums to start playing.
3.
Use your left hand to play a chord (or a single note).
Use your left hand to play the backing chord, and your
right hand to play the melody.
If you’re not using the lower area of the keyboard (the Lower
Part area) to enter chords, only the drum pattern of the Style
will be heard.
4.
If you play a different chord (or single note), the backing
key will change.
The chord name is displayed in the backing chord area of the
screen.
5.
Use the STYLE CONTROL buttons to select a different
pattern for the currently selected Style.
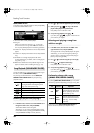
Changing the Variations
You can press the
VARIATION buttons
to change the type of
ensemble that will play the backing.
The button you press flashes until the new pattern is used (after
which the button lights steadily.)
VARIATION [1]
produces the simplest arrangement, and
VARIATION [4]
produces the most florid.
For an intro or ending,
VARIATION [1]
is the shortest and
simplest.
Using the Auto Fill-in Function
If you leave
[AUTO FILL-IN]
on (button lit), a fill-in will play
when you switch between accompaniment Variations. The fill-
in that is played between the current and the next Variation
pattern depends on where you come from.
What’s a “
Fill-In
”?–A short improvisational phrase inserted at
the bar line is called a “Fill In.” The GW-8 automatically plays
the appropriate phrase for the selected Style.
Stopping a Style
1.
Press [START/STOP] once again to make the backing stop.
If you press [ENDING] instead of [START/STOP], the ending
phrase will play and then the backing will stop.
Adjusting the Part Balance ([PART VIEW])
If [STYLE] is on, or if all of the BACKING TYPE buttons are off,
you can access the PERFORM MIXER screen by pressing [PART
VIEW].
In the PERFORM MIXER screen you can adjust the volume for
each Part of the Style. You can also mute (silence) a specific
Part, or play only a specific Part.
1.
With [STYLE] turned on, press [PART VIEW].
The PERFORM MIXER screen will appear.
2.
Use [ ] [ ] to select the part whose settings you
want to make, and use [ ] [ ] to select the item that
you want to set.
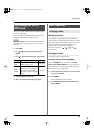
Style (Playing with an
Accompaniment)
Playing Back a Style ([STYLE])
[INTRO]
A backing pattern suitable for an
introduction.
[MAIN]
This is the main accompaniment pattern for
the song.
[ENDING]
A backing pattern suitable for an ending.
Display
Part
LWR
LOWER
UPR
UPPER
ADR
Accompaniment Drum
ABS
Accompaniment Bass
AC1–AC6
Accompaniment 1–6
GW-8_e.book 25 ページ 2008年4月1日 火曜日 午前11時44分