


27
Deutsch Français Italiano Español Português NederlandsEnglish
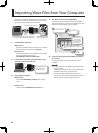
Editing a Sample
MEMO
For details on setting a sample’s GATE, LOOP, REVERSE,
and LO-FI parameters, refer to p. 12.
Setting a Sample’s Volume
Here’s how to adjust the volume of each pad.
1. Make sure that the [PATTERN SELECT] button
is extinguished. If it is lit, press the [PATTERN
SELECT] button to turn it o.
2. Press the pad to which the sample whose volume
you want to adjust is assigned.
The pad will light, and that sample will play.
3. Press the [START/END/LEVEL] button so the
button is lit.
4. Turn the [CTRL 3] (LEVEL) knob to adjust the
sample’s volume.
5. When you’ve nished making adjustments, press
the [START/END/LEVEL] button to turn o its light.
Turning the [CTRL 3] (LEVEL) knob toward the left will
reduce the volume, and turning it toward the right will
increase the volume. A setting of 127 is the maximum
volume. The default value immediately after sampling is
127.
MEMO
While the [START/END/LEVEL] button is lit, you can
adjust not only the volume but also the start point
and end point (p. 27) by using the [CTRL 1] and [CTRL 2]
knobs. If you’ve moved the [CTRL 1] or [CTRL 2] knobs
by accident, set them back to the center position. The
settings will return to their previous values. If you press
the [START/END/LEVEL] button to turn o the button’s
light without returning the knobs to the center, the
modied start point and end point settings will be set.
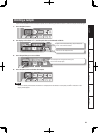
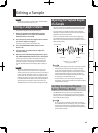
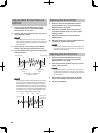
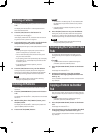
Adjusting the Playback Region
of a Sample
For each sample, the SP-404SX lets you specify the region
within the sample’s waveform data that will actually play.
The point within the waveform data at which playback
will begin is called the Start Point, and the point at which
playback will end is the End Point.
If there is unwanted sound or silence at the beginning
of a sampled sound, you can omit this by adjusting the
Start Point. If the unwanted material is at the end, you can
adjust the End Point.
Start sampling
Start Point
This region will sound
End Point
Unwanted Unwanted
Stop sampling
MEMO
• When you specify the start point or end point, the BPM
(tempo) will be automatically calculated according
to the newly specied duration, and displayed. If the
duration is multiple measures or less than one measure,
the displayed BPM value may be half or double the
actual value. To set the BPM to the desired value, refer
to “Changing a Sample’s BPM” (p. 30).
• In some cases, such as if the length of the region is
three beats, it may not be possible to calculate or adjust
the BPM value correctly.
Canceling the Adjusted Playback
Region (Deleting a Marker)
The [MARK] button will light if you’ve specied either
the start point or end point. If you want to cancel these
settings, press the lit the [MARK] button during playback
to turn o the button’s light.
MEMO
By carrying out the procedure explained in “Deleting
an Unwanted Portion (Truncate)” (p. 29), you can delete
the portions other than the specied playback region,
so that the start point and end point are the beginning
and end of the sample.