


29
Deutsch Français Italiano Español Português NederlandsEnglish
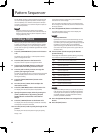
Making Fine Adjustments to the Start
Point and End Point
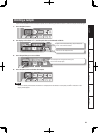
1. Make sure that the [PATTERN SELECT] button
is extinguished. If it is lit, press the [PATTERN
SELECT] button to turn it o.
2. Play the pad whose playback region you want to
adjust, making it the current pad.
3. Press the [START/END/LEVEL] button so the
button is lit.
4. Use the [CTRL 1] knob to adjust the start point,
and the [CTRL 2] knob to adjust the end point.
5. When you’ve nished making adjustments, press
the [START/END/LEVEL] button to turn o its light.
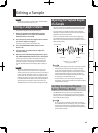
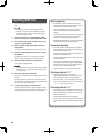
Start sampling
[CTRL 1]
Start Point
[CTRL 2]
End Point
This region will sound
Stop sampling
MEMO
• You can press the pad to produce sound even while
making adjustments.
• For both the [CTRL 1] and [CTRL 2] knobs, turning the knob
toward the left will move the start point/end point toward
the beginning of the sound, and turning the knob toward
the right will move the point toward the end of the sound.
• You can’t adjust the playback region beyond the begin-
ning or end of the sample.
• If you decide to cancel the adjustment, return the [CTRL
1] and [CTRL 2] knobs to the center position so that the
indication is “0.”
• The range of movement for a single operation is ap-
proximately 130 milliseconds before or after the current
start point or end point. If you want to adjust the point by
a greater amount, repeat the same procedure.
• You can’t set the start point and end point closer than
approximately 100 milliseconds.
• If your adjustment results in the start point and end point
being respectively at the beginning and end of the sample,
the [MARK] button will go out.
• If the [MARK] button is extinguished (i.e., if the playback
region has not been adjusted), adjusting the sample’s start
point or end point will cause the [MARK] button to light.
• When you move the start point or end point, the sample’s
BPM (tempo) will automatically change accordingly.
However, there will be a small discrepancy in the BPM.
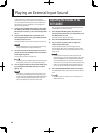
Deleting an Unwanted Portion
(Truncate)
By specifying the start/end points and then deleting the
unneeded portion (Truncate), you can make more ecient
use of memory.
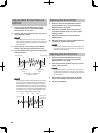
Start sampling
Start Point
This region will sound
Truncate
End Point
Unwanted Unwanted
Stop sampling
NOTE
This operation cannot be undone.
1. Play the pad that you want to truncate, making it
the current pad.
2. Make sure that the [MARK] button is lit (indicating
that the playback region has been adjusted).
3. Press the [DEL] button.
4. Press the [MARK] button. The display indication
will change to “
trC.”
5. Press the [DEL] button, and the truncation process
will begin. When “
trC” disappears from the
display, the operation is complete.
MEMO
Never turn o the power before this operation has
been completed. Doing so will destroy the SD card.