


33
Deutsch Français Italiano Español Português NederlandsEnglish
The [REC] button will change from blinking to lit, and
recording will begin.
There will be a one-measure count before recording
actually begins, so wait for one measure while listening to
the metronome. During this time, the display will indicate
a count of -4, -3, -2, -1.
When the count ends, recording will begin, and the display
will indicate the measure and beat.
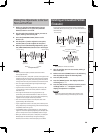
15. Press the pads at the desired timing.
During recording, you can use the pads to play samples.
You can also press a bank button to switch sample banks.
The samples of the pads you pressed will play, and will be
recorded at the timing specied by the selected quantize
setting.
When the measure number shown in the display reaches
the pattern length you specied, you will automatically
return to measure one, and recording will continue (“loop
recording”). The previously recorded performance will play
back during this time.
If you press the [REC] button once again so the button is
blinking, the display will indicate “
rEH” and you’ll be in
Rehearsal mode. In this state, pressing the pads will play
the corresponding samples, but they won’t be recorded.
When you press the [REC] button once again so the
button is lit, you’ll exit Rehearsal mode and return to the
conventional recording mode.
This gives you a convenient way to nd the next sample
that you want to play.
16. Press the pads of samples that you want to
overdub.
The pad performance that you recorded on the previous
pass will be recorded along with your newly added pad
performance (overdubbed). You can use this method
to gradually build up complex rhythms that would be
impossible to play all at once.
During this recording process, you can change the
quantization as follows.
1. Press the [QUANTIZE] button so the button is
lit.
2. Turn the [CTRL 3] knob to change the quantize
setting.
3. When you’ve made the desired setting, press
the [QUANTIZE] button to extinguish the
button.
The new quantize setting will be applied immediately.
17. When you want to stop recording, press the
[CANCEL] button.
The dot in the display will blink. When the blinking stops,
recording is complete.
NOTE
Never turn o the power while the dot is blinking.
Doing so may destroy the SD card.
Erasing a Mistake from Your
Performance
If you’ve played a sample by mistake while recording,
you can use the corresponding pad to erase it from the
recorded pattern.
1. Press the [PATTERN SELECT] button so the button
is lit.
The display will indicate “Ptn” and pads to which a
pattern is assigned will blink.
2. Press the [REC] button so the button is lit.
3. Press the pad for the pattern containing the
performance from which you want to delete the
mistake.
The pad you pressed will light, and the other pads will go
out. The [REC] button will blink, and the metronome will
begin sounding.
4. Press the [REC] button to start recording.
The [REC] button will change from blinking to lit, and
recording will begin.
The recorded performance will play back. If you press the
pad of a sample at this time, it will be recorded.
5. Press the [DEL] button so the button is lit.
The display will indicate “ErS.”
6. Press the pad for the sample that you want to
erase, throughout the period where you want the
erasure to take place.
The dot in the display will blink, and any occurrences of
that sample will be erased from the pattern during the
duration that you hold down the pad.
MEMO
By holding down the [HOLD] pad you can erase the
performances of all pads.
7. Repeat step 6 as desired.
8. When you’ve nished erasing mistakes, press the
[DEL] button.
The [DEL] button will go out, and the pattern will return to
normal recording.
If you press the pad of a sample at this time, it will be
recorded.
9. Press the [CANCEL] button to carry out the
erasure.
The dot in the display will blink while the erasure is
being carried out. When the blinking stops, the erasure is
complete.
NOTE
Never turn o the power while the dot is blinking.
Doing so may destroy the SD card.