


50
Optimizing the pad settings (Trigger parameters)
Connections
Settings
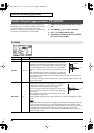
1. Make sure that the VH-11 is correctly connected to
the TD-9.
2. Set up the hi-hat, take your foot off the pedal, and
power-on the TD-9.
* It will be impossible to make the adjustment correctly if the
hi-hat is touching the motion sensor when you turn on the
power.
3. Loosen the clutch screw, and allow the hi-hat to rest
naturally on top of the motion sensor unit.
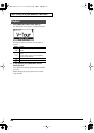
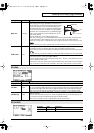
4. Press [SETUP]-[F1] (TRIG).
The “TRIGGER TYPE” screen will appear.
5. Use [CURSOR] to move the cursor to “H” (HI-HAT).
6. Use [+/-] or [VALUE] to choose “VH11.”
7. Press [F3] (ADVNCD)-[F3] (HI-HAT).
The following screen will appear.
8. Verify the TD-9’s setting.
9. While you watch the meter that’s displayed in the
right side of the screen, turn the VH-11’s VH offset
adjustment screw to adjust it.
Adjust the screw so that the black appears in the
meter.
10. Adjust other parameters as needed.
If you don’t set up the VH-11 correctly, it may not operate
correctly. For details, refer to the VH-11 owner’s manual.
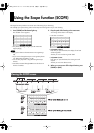
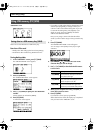
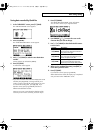
Connecting the VH-11 and making settings on the TD-9
TRIGGER
OUT jack
Connect the
HH cable
Connect the
HHC cable
CONTROL
OUT jack
Motion sensor
unit
Parameter
Value
Hi-Hat Type
VH11
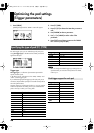
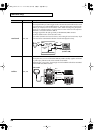
VH Offset
Adjustment
Screw
OPEN CLOSE
VH Offset Adjustment Points
If the closed hi-hat sound is difficult to attain, rotate the VH
offset adjustment screw towards “CLOSE.”
If the open hi-hat sound is difficult to attain, rotate the
screw towards “OPEN.”
If the sound cuts off when you strike the hi-hat
forcefully, rotate the VH Offset adjustment screw
towards “OPEN.”
TD-9_e.book 50 ページ 2008年1月23日 水曜日 午後4時24分