


BUILT-IN HARD DISK
Hard disk
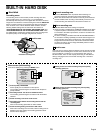
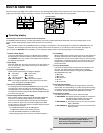
Recording areas
The recording areas on the hard disk (normal recording area: 80%,
alarm recording area: 19%, archive area: 1%) are established
automatically when the power for the digital video recorder is turned on.
Images are recorded in the normal recording area when the REC/STOP
button is pressed, and they are recorded in the alarm recording area
when an alarm occurs. This is called the default condition, and the
following detailed settings can be confirmed in the sections on
“RECORDING IMAGES IN THE NORMAL RECORDING AREA” and
“RECORDING IMAGES IN THE ALARM RECORDING AREA” which
are explained later. Furthermore, settings such as the recording areas
and picture quality can be changed using the menu screens.
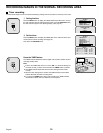
A Normal recording area
•
When the REC/STOP button is pressed while monitoring is in
progress, images are recorded in the normal recording area.
•
When start and end times are entered for each day of the week and
are then enabled, timer recording is automatically carried out in the
normal recording area between the times that have been set.
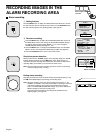
B Alarm recording area
ALARM REC MODE SET menu settings are required.
•
Alarm recording is enabled when ALARM RECORDING is set. When
a suspicious person is detected by the switch or motion sensor that
is connected to the alarm input terminal, an alarm is recorded in the
alarm recording area.
•
Pre-alarm recording is enabled when PRE-ALARM RECORDING is
set. Pre-alarm recording repeatedly records the same images as for
normal recording in the alarm recording area, and overwrites these
images after the set time interval, until an alarm is detected. When
pre-alarm recording is set, the image immediately before an alarm
occurred can be recorded.
C Archive area
This is the area for copying important images from the normal recording
area and the alarm recording area. The size of the archive area can be
set to a maximum of 10 GB (12.5% of total capacity when using an
80-GB hard disk, 6.25% of total capacity when using an 160-GB hard
disk) by changing the size of the normal recording area or the alarm
recording area.
Archive areaC
Normal recording area
Normal recording area
Normal recording areaA
Alarm
recording
area
Alarm
recording
area
B
Hard disk recording areas
1%
80%
19%
1%
80%
19%
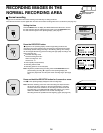
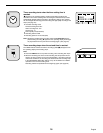
Menu screen (initial setting)
This can be displayed by pressing the MENU button.
1
Picture quality: ENHANCED
Picture quality can be selected from five options.
The recording speed changes in accordance with the picture
quality selected.
2
Recording method: Can be set to FRAME or FIELD.
The recording speed changes in accordance with the method
selected.
3
Audio recording: Can be set to ON or OFF.
4
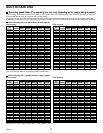
Recording speed: Shows the recording interval and the
recording time.
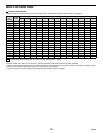
Refer to the recording speed table for further details.
5
Alarm recording setting: Can be set to ON or OFF.
When alarm recordings are to be made, select a setting such as
MODE1 for the OFF setting. The recording speed and alarm
duration will be displayed
A
Setting screen for normal recording area picture quality,
recording speed, etc.
B
Setting screen for alarm recording area picture quality,
recording speed, etc.
<RECORDING AREA SET>
TOTAL CAPACITY : 80GB
NORMAL RECORDING AREA : 80 %
AREA FULL RESET ->
ALARM RECORDING AREA : 19 %
AREA FULL RESET ->
ARCHIVE AREA : 1 %
AREA FULL RESET ->
CAUTION : WHEN THE AREA SETTING IS CHANGED.
THE WHOLE AREA WILL BE INITIALIZED !
A
B
A
B
C
<NORMAL REC MODE SET>
PICTURE QUALITY : ENHANCED
FRAME/FIELD RECORDING : FIELD
AUDIO RECORDING : OFF
REC CYCLE : 0.10SEC ( 54H)
1
2
3
4
<ALARM REC MODE SET>
PICTURE QUALITY : ENHANCED
FRAME/FIELD RECORDING : FIELD
AUDIO RECORDING : OFF
ALARM RECORDING : OFF
REC CYCLE : 0.10SEC. DURATION: 1SEC
PRE-ALARM RECORDING :
¤¤¤
REC CYCLE :
¤¤¤
SEC. DURATION:
¤¤¤
=> (46400 ALARMS CAN BE RECORDED)
ALARM TRIGGER : ALARM
MOTION SENSOR ->
1
2
3
4
5
10
English