


19
EN
RecordingRecording
Initial Recording
This shows you how to record the very first track onto
a blank disc.
Preparations
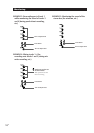
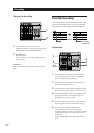
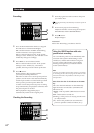
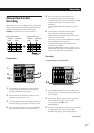
1
Set the INPUT switch for the channel to which
you will input the instrument or microphone
sound to LINE/MIC (up position).
2 Set the fader for the channel to which you will
input the sound to about 7 or 8.
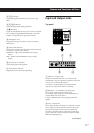
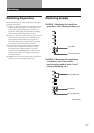
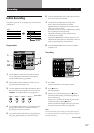
3 Use the ASSIGN switch and PAN knobs to direct
the sound to the group path you want to record.
EXAMPLE: To assign channel 1 to group path 1
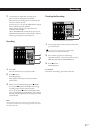
4 Press the REC SELECT key corresponding to the
group path number you selected in step 3 to
specify the track to be recorded.
5 Press the monitor track set key corresponding to
the group path number you selected in step 3.
6 Turn the MONITOR knob to adjust the sound to a
level which can be monitored.
7 Use the fader to adjust the recording level.
Play a relatively loud phrase and make
adjustments by watching the level meter for the
track you want to record.
If necessary, you can use the TRIM knob to adjust
the recording level and equalizer.
Adjust the recording level so that the CLIP
indicator does not light.
Adjust the TRIM knob so that the proper level is
obtained when the fader is set between 7 and 8 to
achieve good frequency characteristics.
8 Turn the MONITOR knob as in step 6 to adjust
monitor level.
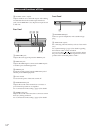
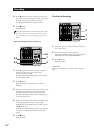
Recording
1 Press REC.
The unit switches to record pause mode.
2 Press ( PLAY.
Recording begins
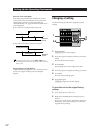
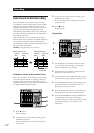
3 When you’ve finished playing, press p STOP.
This unit automatically goes to the beginning of
the recorded song.
It takes a few seconds for the unit to process the
information after pressing p STOP.
Please note that the length of the song is fixed at
the point where the initial recording ends.
Note
Do not turn off the power during recording. Not only may
you loose the data for the current song, you may loose all of
the data on the disc.
ASSIGN ASSIGN ASSIGN ASSIGN
1 2 1 2 1 2 1 2
3 43 43 43 4
Press down
(continued)
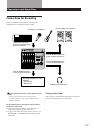
1
2
3
6,8
5
2,7
3
4
1
b
Track
1
2
3
4
Recorded
section