


29
EN
Recording
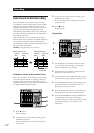
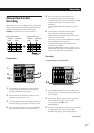
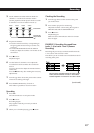
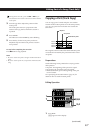
3 Set the ASSIGN switches and PAN knobs for
channels 1~4 to direct the sound to track 4.
(Set the playback sounds input from the recorder
to channels 1~4 to be recorded on track 4.)
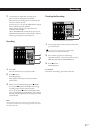
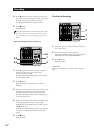
4 Prepare the monitor.
• Press the monitor track key corresponding to
the group path selected in step 3 (in this case,
press 3-4).
• Turn the MONITOR knob and the TRACK
knob(s) to adjust the sound to a level that can be
monitored.
5 Press ( PLAY.
Playback begins.
6 Use the faders for channels 1~4 to adjust the
record balance of the sound to be recorded on
track 4.
You may also need to adjust the monitor balance
at this time.
Press the p STOP key after making the necessary
adjustments.
7 Turn the jog dial to locate the point on the counter
where the recording will begin.
8 Press the REC SELECT key for track 4.
This makes it possible to record on track 4.
Recording
1 Press REC.
The unit switches to record pause mode.
2 Press ( PLAY.
Recording begins.
Play together with the previously recorded
performance.
3 When you’ve finished playing, press p STOP.
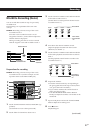
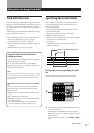
Checking the Recording
1 Turn the jog dial to set the counter to the point
you want to hear.
2 Press CUE to prepare for monitoring.
Adjust the monitor volume using the respective
TRACK knobs and the MONITOR knob.
3 Press ( PLAY.
Playback begins.
Make sure the CLIP indicator on the level meter
does not light.
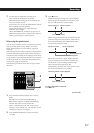
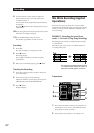
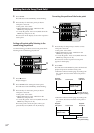
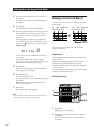
EXAMPLE 2: Recording the sound from
tracks 1~4 to tracks 1 and 2 (Bounce
Recording)
Recording the previously recorded sound from tracks
1~4 in a stereo mix to tracks 1 and 2.
This allows you to use tracks 3 and 4 as blank tracks for
recording other parts.
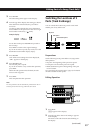
ASSIGN ASSIGN ASSIGN ASSIGN
PANPANPANPAN
1 2 1 2 1 2 1 2
L R L R L R L R
3 43 43 43 4
Press down
(continued)
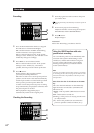
b
A
B
C
D
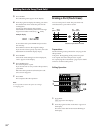
A B C D
The previously recorded contents of tracks 3 and 4
remain, but the contents of tracks 1~4 have been
recorded together in a stereo mix on tracks 1 and 2.
Turn all the
way toward
“R”.