


TASCAM DR-680
15
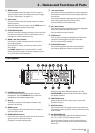
2 – Names and Functions of Parts
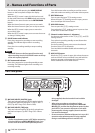
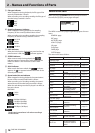
Home Screen
1 Take name
When stopped or during playback, the name of the
currently loaded take is shown.
When recording or in recording standby, the name of
the take being recorded is shown.
Up to 11 characters are shown. Longer names are
scrolled.
2 Recorder operation status
The operation status of the recorder is shown with one
of the following icons.
: Stopped
: Playing back
: Paused
: Searching forward
: Searching backwards
: Recording
: Recording standby
: Skip forward
: Skip backward
3 Repeat icon
When the repeat function is ON, the repeat icon
appears.
4 Power supply status
When operating on battery power, a battery icon
appears.
Depending on the amount of remaining battery power,
a number of bars appear ( , or ).
When the battery charge is very low, the last bar disap-
pears, the icon blinks, and the unit’s power will
soon change to standby.
When using the included AC adaptor (GPE248-
120200-Z), the icon appears.
NOTE
Even before the batteries lose their charge, a “Battery
Low” warning pop-up message might appear if you try
to start recording or conduct another operation that
requires considerable power.
5 Level meters
These show the levels of tracks 1–6 and the stereo
track.
When recording, if stereo track recording is ON and the
stereo track recording source is set to DIGITAL IN, the
stereo track meters become the DIGITAL IN input level
meters.
During playback of a multitrack file, the playback levels
of each track are shown.
When recording, the recording levels of each track are
shown.
When recording, if a signal is distorted at the input
stage, the area beneath its meter is highlighted.
If a recording level exceeds 2.0 dB below the maximum
level, a mark appears at the top of its meter, indicating
an overload.
Ch2: Signal is distorted at the input stage
Ch4: Recording level exceeds 2.0dB less than the
maximum level.
During stereo track playback, the meters for tracks 1
and 2 function as the L and R meters.
When a track is armed for recording, “º” appears
beneath its meter.
When a track is soloed, “ ” appears beneath its meter.
NOTE
If a track is both armed for recording and soloed, only
“ ” appears beneath its meter.
6 Time (hours: minutes: seconds)
During playback, the elapsed playback time of the take
is shown.
Press the HOME/DISPLAY button on the front panel
to show the remaining time of the take as a negative
number.
When recording, the elapsed recording time of the take
is shown.
Press the HOME/DISPLAY button on the front panel
to show the remaining available recording time for the
take.
7 Playback position
This bar shows the current playback position during
playback or the amount of remaining time available for
recording during recording. As recording or playback
progresses, the bar darkens from the left.
8 Mark information
The mark number and the total number of marks in the
current take are shown.
During playback, the number of the mark that is before
and closest to the current position is shown.
When recording, the last added mark number is shown.