


27
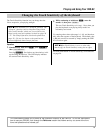
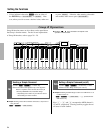
When power
is turned on
Program
Change is
selected.
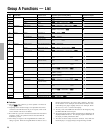
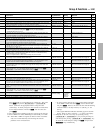
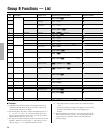
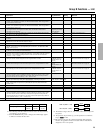
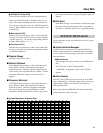
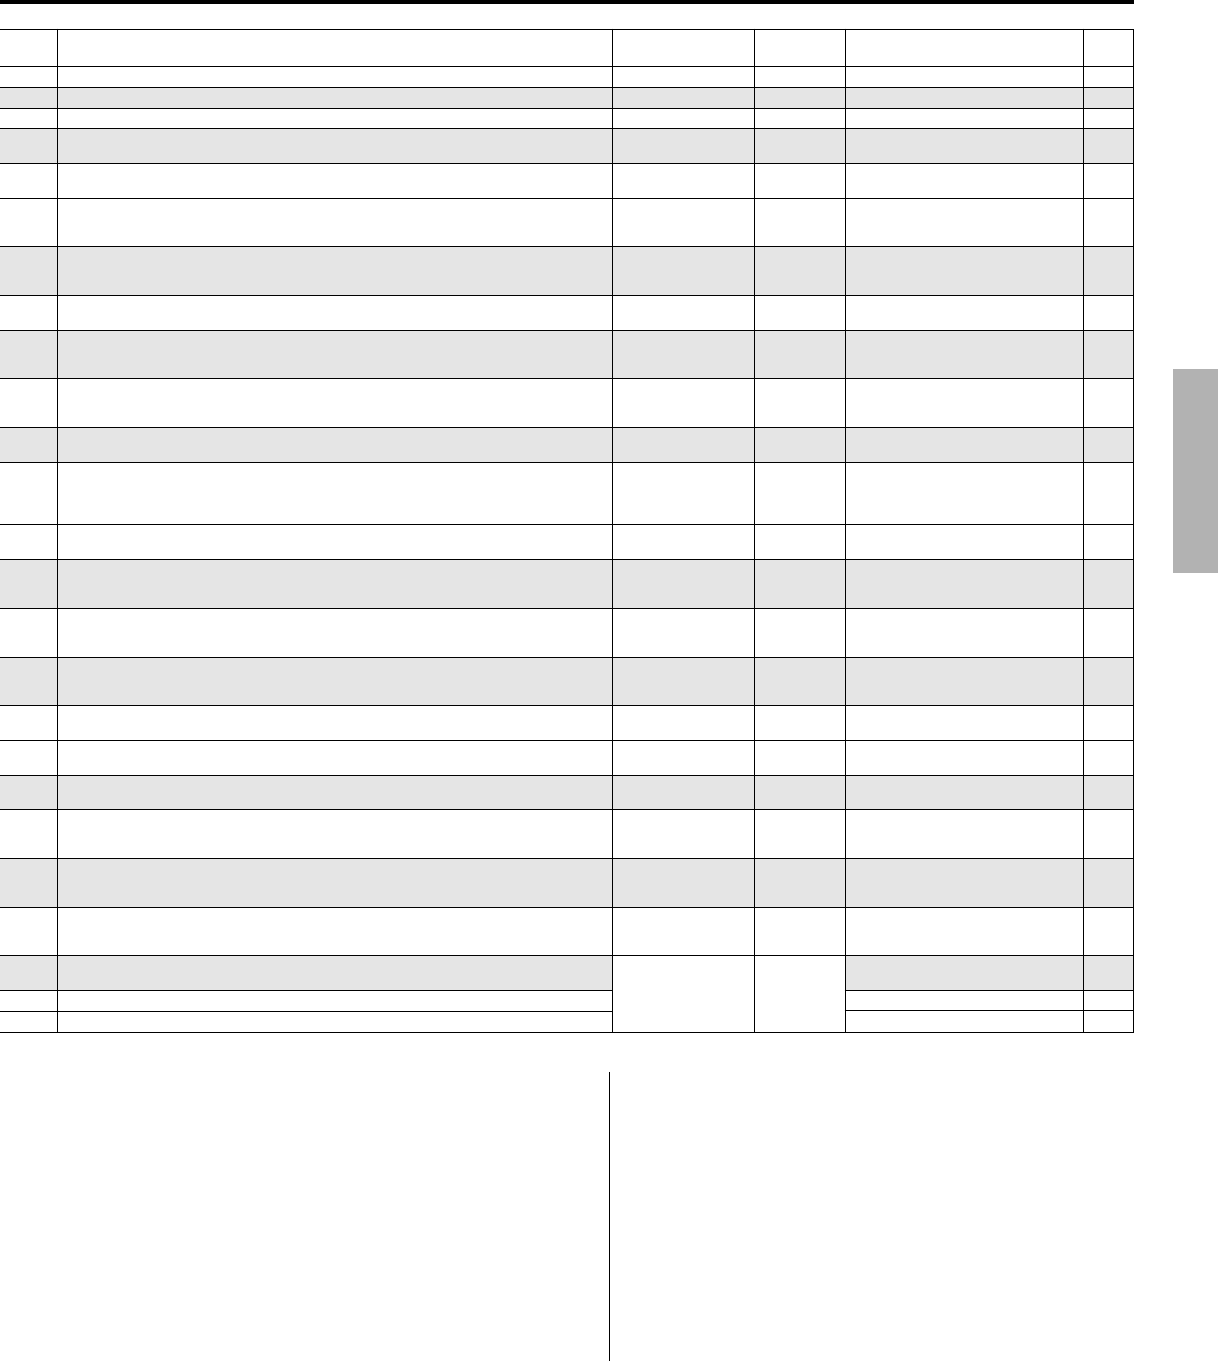
Group A Functions — List
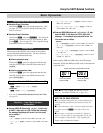
Select MSB/LSB; see corresponding Group A functions). Then, hold
down C and press the N or M
button. (Hold down the appropriate button to change the value
continuously.) To directly change the value (decimal or hexadecimal)
for the displayed function, hold down C , enter the value, then
press L.
*8 The connected device initializes itself upon reception of this message.
*9 When a MIDI error results, MIDI Merge is automatically set to OFF.
*10 • When RPN or NRPN is assigned, the Wheel or Slider is automati-
cally set to control Data Entry and will change the relevant
parameter on the connected device.
Range (Hexadecimal Default
in parentheses) setting MIDI Code Notes
- - <<FC>> *2
- - <<FB>> *2
- - <<FA>> *2
0, 20-300(0, 14-12C) 0(oFF) <<F8>> *2, *4
MSB:000-127(00-7F) MSB:000 <<Bn 00 msb, Bn 20 LSB, Cn pp>> *5, *7
LSB:000-127(00-7F) LSB:000
1-128(1-80) 1 <<Cn pp>> *6, *7
- - <<F0 7E 7F 09 01 F7>> *8
- - <<Bn 78 00>>
- - <<F0 43 1s 4C 00 00 7E 00 F7>> *8
on, oFF on -*9
1-16(1-10) 1 - *3
0, 1-127(0, 1-7F) 0(oFF)-
MSB:000-127(00-7F) - <<Bn 64 LSB, Bn 65 MSB, Bn 06 vv>> *5, *10
LSB:000-127(00-7F) Refer to the Controller list on page 30.
0-158(0-9E) 1 <<Bn gg vv>>etc.. *10
Refer to the Controller list on page 30.
MSB:000-127(00-7F) - <<Bn 62 LSB, Bn 63 MSB, Bn 06 vv>> *5, *10
LSB:000-127(00-7F) Refer to the Controller list on page 30.
0-127(00-7F) 0 -
0-12(0-C) 0 - *11
0-12(0-C) 0 - *11
MSB:000-127(00-7F) - <<Bn 64 lsb, Bn 65 msb, Bn 06 vv>> *5, *10
LSB:000-127(00-7F) Refer to the Controller list on page 30.
0-158(0-9E) 6 <<Bn gg vv>>etc.. *10
Refer to the Controller list on page 30.
MSB:000-127(00-7F) - <<Bn 62 lsb, Bn 63 msb, Bn 06 vv>> *5, *10
LSB:000-127(00-7F) Refer to the Controller list on page 30.
0-127(00-7F) 0 -
Toggles among -
the three settings.
-
-
Explanation
Stop command for sequencer/rhythm machine.
Continue command for sequencer/rhythm machine.
Start command for sequencer/rhythm machine.
Tempo entry for sequencer/rhythm machine. Setting to 0 disables the MIDI clock transmission.
When Assignable Wheel or Slider is set to Tempo (158), this is inactive.
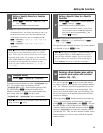
This allows selection of voice banks on tone generators that support multiple banks. This
message must include both MSB and LSB values.
Transmits the selected program change number. Stepping up or down through program
numbers is also possible by holding down C and using the N/
M buttons (page 16).
This resets the connected tone generator to GM operation. Caution: Be careful when using
this, since it automatically changes whatever settings you’ve made on the tone generator.
(Only GM compatible tone generators respond to this message.)
This turns all sounds off over the current MIDI channels. To turn all sounds off for all MIDI
channel, use All Sounds Off in Group B.
This resets the connected tone generator to XG operation. Caution: Be careful when using
this, since it automatically changes whatever settings you’ve made on the tone generator.
(Only XG compatible tone generators respond to this message.)
When set to ON, this merges all data received at MIDI IN with the data generated by the
CBX-K2. Merge can be set independently for each channel in the Group B. (For details about
MIDI Merge, refer to page 34.)
This determines the MIDI transmit channel for the CBX-K2. This should be set to match the
MIDI receive channel of the connected MIDI device.
This sets a fixed velocity value for the keyboard; in other words, playing the keyboard at any
strength results in a certain velocity value. When this is set to 0 or “oFF”(initial touch on),
Touch sensitivity can be set in the Group B .
When the Assignable Wheel or Slider is set to Velocity(157), this is inactive.
This determines the RPN (Registered Parameter Number) controller for the Assignable Wheel.
The message must include both MSB and LSB values.
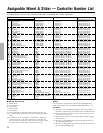
This determines the Controller number for the Assignable Wheel. Though not all are listed on
the panel, any of the standard Control Change numbers (0 - 119) can be assigned. (For a
complete list of the available controllers and their numbers, see on page 30.)
This determines the controller by using NRPN ( Non-Registered Parameter Number) for the
Assignable Wheel. Refer to the Controller list on page 30. The message must include both
MSB and LSB values.
This determines the drum number for use with the Wheel and the assigned drum-related
control number (136 - 151). The following alternate operation can also be used: C +
F → [note number (of desired drum sound)] → L
This lowers the key transposition by the specified amount (in semitones).
This raises the key transposition by the specified amount (in semitones).
This determines the RPN (Registered Parameter Number) controller for the Assignable Slider.
The message must include both MSB and LSB values.
This determines the Controller number for the Assignable Slider. Though not all are listed on
the panel, any of the standard Control Change numbers (0-119) can be assigned. (For a
complete list of the available controllers and their numbers, see on page 30.)
This determines the NRPN (Non-Registered Parameter Number) controller for the Assignable
Slider. The message must include both MSB and LSB values. (Refer to the Controller list on
page 30.)
This determines the drum number for use with the Slider and the assigned drum-related
control number (136 - 151). The following alternate operation can also be used: C +
F → [note number (of desired drum sound)] → L
Changes the LED display to show the currently selected program number.
Changes the LED display to show the currently selected Bank Select MSB value.
Changes the LED display to show the currently selected Bank Select LSB value.
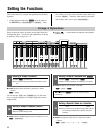
• To send a specific value for the current control number assignment
of the Wheel or Slider, hold down C , enter the desired value,
and press L. However, this cannot be done with the following
controller numbers: 153 (Key Pressure), 157 (Velocity), or 158
(Tempo).
• The assigned MSB and LSB values alternately appear in the LED
display. When no value is assigned, “---” is shown in the display.
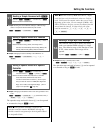
*11 Transpose can be done in two ways: by repeatedly pressing
G or H key or by entering the transpose
value directly after pressing G or H key.
To restore the normal transpose setting, hold C and press both
fl keys simultaneously.