


7
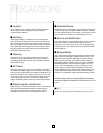
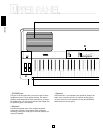
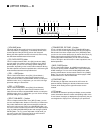
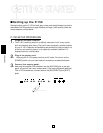
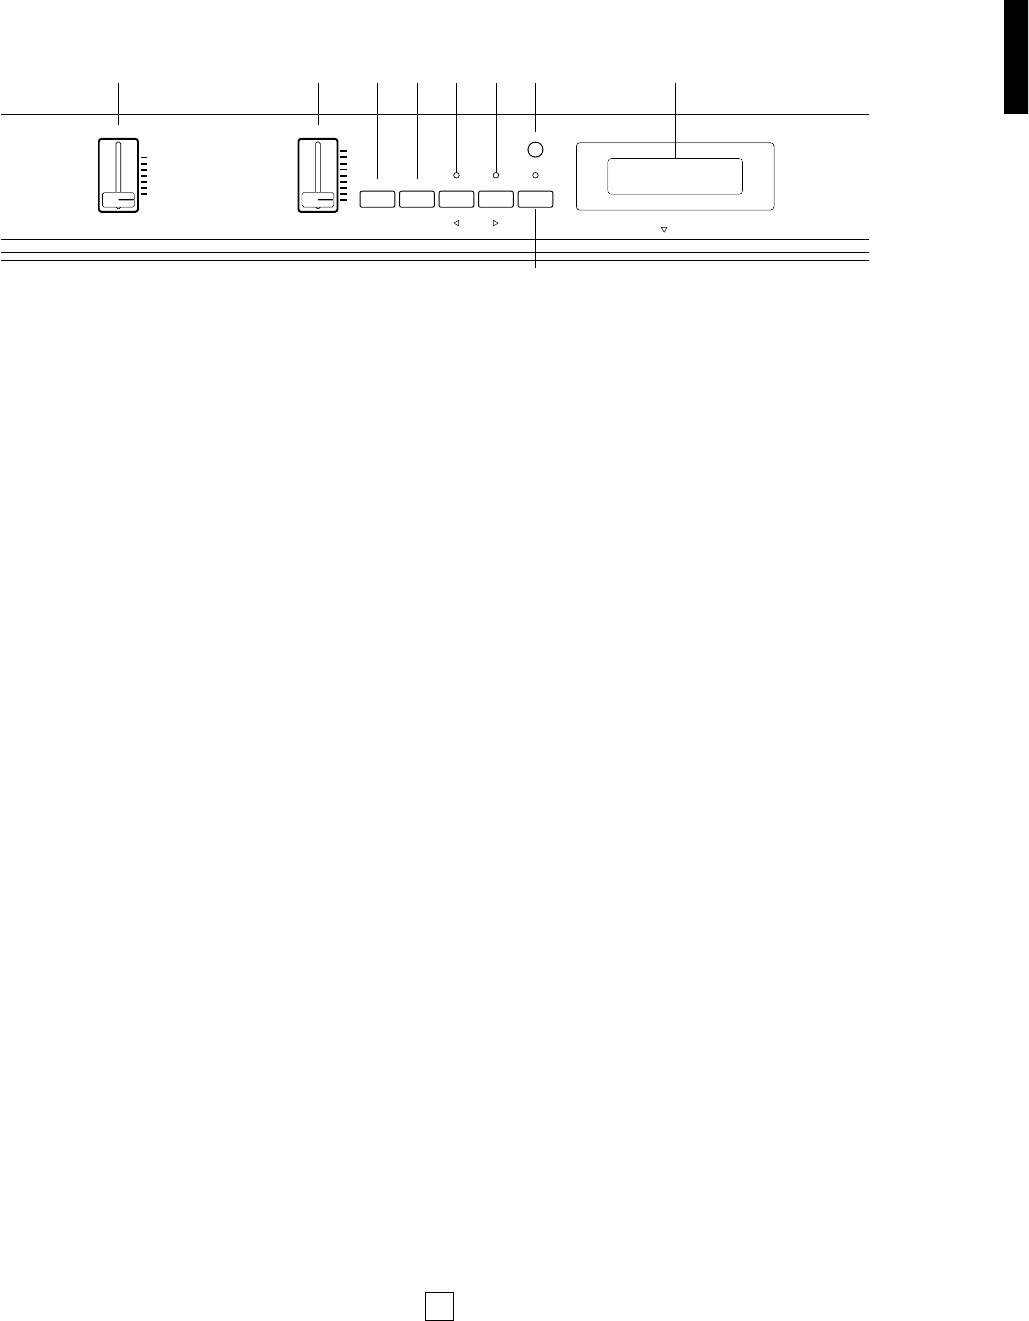
UPPER PANEL
1 [VOLUME] slider
This slider adjusts the overall volume of sound output from the
internal speakers (or headphones, if connected) as well as the
sound output from the [OUTPUT] jacks on the rear panel.
Moving the slider upward increases volume level, while moving
the slider downward decreases volume level.
2 [CS, DATA ENTRY] slider
This is a multiple function slider. As a [CS] (continuous slider),
you can assign it to control a variety of functions. As a [DATA
ENTRY] slider, you can use it to change specific settings and
parameters, depending on the current mode and status. Moving
the slider upward increases the specified value, while moving the
slider downward decreases the specified value.
3 [PS1, –1/NO] button
This is a dual function button. As a [PS1] (Panel Switch 1)
button, you can assign it to control various functions of the
internal voices as well as connected MIDI devices, as set by the
PS Edit function. As a [–1/NO] button, you can use it to change
parameter settings in decrements.
4 [PS2, +1/YES] button
This is a dual function button. As a [PS2] (Panel Switch 2)
button, you can assign it to control various functions of the
internal voices as well as connected MIDI devices, as set by the
PS Edit function. As a [+1/YES] button, you can use it to change
parameter settings in increments.
5 [SPLIT, BALANCE, 1] button
This is a multiple function button. As a [SPLIT] button, you can
use it to enter Split mode, whether in Voice Play or Performance
Play mode, determine the split point and assign the keyboard
area for the main and sub voices. As a [BALANCE] button, you
can use it to set the relative volume levels of each Split and Dual
voice, by holding the [BALANCE] button and moving the [DATA
ENTRY] slider ". As a [1] (cursor left) button in Edit mode, you
can use it to move the cursor to the left in the LCD screen in
order to position it over a desired parameter.
6 [TRANSPOSE, DETUNE, q] button
This is a multiple function button. As a [TRANSPOSE] button,
you can use it to set the keyboard transpose value for single as
well as both Dual voices or Split voices. As a [DETUNE] button,
you can use it to set the detune value for the two Dual voices, by
holding it and moving the [DATA ENTRY] slider ". As a [q]
(cursor right) button in Edit mode, you can use it to move the
cursor to the right in the LCD screen in order to position it over a
desired parameter.
7 [MIDI, PAGE] button
This is a dual function button. As a [MIDI] transmit button, you
can use it to quickly enable or disable the P-150’s transmission
of MIDI messages. You can also hold the [MIDI] button while
pressing other buttons to access certain features. As a [PAGE]
button, you can use it to step through the various pages of Edit
functions when the P-150 is in Edit mode.
8 [CONTRAST] dial
This dial lets you adjust the contrast of the LCD screen for
optimum visibility. Rotating it to the left will decrease screen
contrast, while rotating it to the right will increase screen
contrast.
9 LCD screen
This backlit 32-character Liquid Crystal Display screen provides
various information about the modes and operating status of the
P-150. Certain messages are displayed only temporarily, but you
can designate the “Popup Time” according to your preference.
CONTRAST
MIN
MAX
VOLUME
-1/NO +1/YES
BALANCE DETUNE
PAGE
PS1 PS2 SPLIT TRANSPOSE MIDI
C3
DATA ENTRY
CS
1 2 3 4 5 6
7
89
■ UPPER PANEL— B