


INPUT MONO
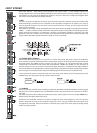
Adjustments in the MID frequency range are certainly the most effective way to shape the sound. As a matter of
fact, determining the correct center frequency is not always as easy as it seems. Here is one method – amongst
others – how to quickly fi nd the right setting of the parametric EQ for your application:
Setting Instructions:
1. Slightly lower the channel fader to avoid feedback.
2. Position the MID rotary control in the range of +9dB … +15dB.
3. Play the desired sound source or talk into the microphone.
4. While doing so turn the frequency rotary control (kHz) slowly from left to right.
5. Surely and within no time, you will detect the frequency range that is not to your liking or causing
feedback.
6. Leave the frequency control in this position and turn the MID control to the left until the sound is natural or
to your liking.
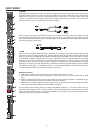
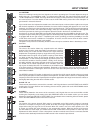
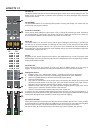
8. AUX / FX 1/2
The AUX/FX controls allow adjusting individual amounts of the input signals to be routed to the integrated FX1
or the FX2 effects units. The signal path is split post volume fader – POST FADE – so that the fader setting
also infl uences the amount of the signal that is fed to the FX units. Using the AUX/FX controls lets you easily
assign special effects to groups of musical instruments or vocals. For example, you can assign a short reverb
effect of the FX1 unit to the lead vocals and a combined effects program – echo, hall, and chorus – via FX2
to the background vocals. To determine the desired intensity of each effect, you should start with the controls
set at their center and make individual adjustments from there on. Please monitor the PEAK LEDs in the
FX1/2 channels. The indicator should only light briefl y at the occurrence of high program peaks. If the indicator
lights constant, you should lower the send levels of the channels in which program peaks occur. For further
information, please read the paragraphs about the FX1/2 units. (In case you are not using the internal FX units
and/or you want to connect external signal processing units, the pre-mixed AUX/FX1/2 signals are outputted
via the AUX1/2 send jacks.)
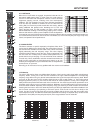
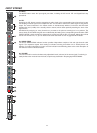
9. AUX 3/4
AUX 3 and AUX 4 controls are primarily meant for establishing two independent monitor mixes. Using the
master section’s AUX PRE/POST switches allows determining whether the signals are split pre or post fader.
PRE-FADER: The audio signal that is present at the AUX control is tapped pre volume fader and therefore not
affected by the fader’s setting. This mode is mainly used for monitoring. Pre-Fader Monitoring is especially
preferable when monitoring and main mix need to be completely different from each other, e.g. when the
volume setting of particular musical instruments or vocals needs to be higher or lower than in the main mix. In
most cases the mixing console is placed somewhere in the audience area (FOH) and is being operated by an
experienced sound technician.
POST-FADER: The audio signal that is present at the AUX control is tapped post volume fader and therefore
affected by the fader’s setting. This mode is mainly used for establishing FX- or special monitoring mixes.
Using the POST-Fader method is recommended when the mixer is also located on the stage and you have to
operate it yourself. Setting all AUX3 or AUX 4 controls to their center position, the main mix is also present on
the monitor bus, giving you the opportunity to control the volume settings of each channel individually from the
stage. The overall volume of the monitor mix is set using the AUX3/AUX4 faders in the master section. If you
are using this option you should keep in mind that all volume changes made with the channel faders also apply
to the monitor mix, leaving you with a higher risk of acoustic feedback.
The Post-Fader Monitoring method provides the possibility of canceling channels of some instruments – like kick
or snare drum, which are in fact already very loud on-stage – from the monitor mix by turning the corresponding
controls all the way to the left.
8