


Elation Professional® www.elationlighting.com - DMX Programmer Page 20Elation Professional® www.elationlighting.com - DMX Programmer Page 19
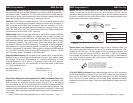
DOWNLOAD SOFTWARE BY RS-232
To connect to a PC, you will need a serial lap link cable. NOTE: A stan-
dard RS-232 cable will not work. This cable is available at any computer
store. You will also need a PC that is running Windows Version 95/98/2000
or higher. Windows comes with an accessory called Hyper Terminal that
can communicate with SD-808 via one of the “COM” ports on your PC.
Determine which of your “COM” ports is available. COM 1 is generally used
for the mouse, so it is advisable to connect to COM 2 on your PC.
You must first configure Hyper Terminal to work with the DMX Programmer.
1. Start the Hyper Terminal program by clicking on “Start” in Windows,
then “Programs” then “Accessories” then “Communications” then
“Hyper Terminal”.
2. Once the Hyper Terminal Program is getting started, you will be asked
to choose a name and icon. Name it DMX PROGRAMMER then pick
any icon then click OK. Go to the next dialog box “Connect to” and
choose “Direct to COM 2” or whichever port is free. Ignore the tele-
phone number and other setting in this box, then click “OK”.
3. In the next dialog box, set the Bits per Second to 57,600, the Data Bits
to 8, Parity to none, Stop Bits to 1, Flow Control to none, and then
click “OK”. You will then access the Hyper Terminal desktop.
Once you access the Hyper Terminal desktop, click the File menu in the
upper left corner of the desktop. Go into “Properties”, then select the “set
-
tings” tab. Now that you are in the “settings” menu, click on “ASCII Setup”.
In the next menu, leave all the settings deselected, then click “OK”. Close
and save the Hyper Terminal. You may want to make a shortcut on your
desktop. Now you can click on the DMX PROGRAMMER.ht icon to access
the Hyper Terminal configuration quickly.
4. Click on the “Transfer” menu in the menu bar, then select “Send text
file”.
5. A dialog box will appear, that allows you to select the data file that you
want to send. Be sure that the file is available. Clicking “OK” will allow
the unit SD-808 to download the software from the computer. While
downloading the LED WINDOW will flash “rECE”.
6. If you succeeded in downloading the software, the LED WINDOW will
show “good”, and will automatically exit from Record mode. If the
download fails, the LED WINDOW will show “Err”. If this occurs, find
out where the problem is and make adjustments, and try again.
7. If this unit loses the software because of a download faliure, you can
DMX Programmer™ Dowloading and Uploading
hold FIXTURE BUTTONS 1, 2, 3, and 4, and switch the unit “On”.
If for someone reason Hyper Terminal is not installed on your version
of Windows, install it from your Windows CD. Go to the Control Panel,
select Add/Remove Programs, select Windows Setup, and then select
Communication. Follow the instructions to complete the installation.
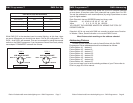
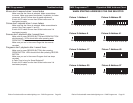
1. Press and hold the RECORD BUTTON for three (3) seconds to
activate record mode. A red LED above the button will be lit
and the
LCD Window will display “1: REC”.
2. Press the UP BUTTON, until the LED WINDOW shows “4:232”. Press
the RECORD BUTTON, the LED WINDOW will show “1: SOF”.
3. Press the RECORD BUTTON, the LED WINDOW will now show
“SOFT”, indicating the DMX Programmer is now receiving the software.
4. If you would like to exit from software download, press and hold the
RECORD BUTTON for three (3) seconds.
DATA UPLOAD
There are seven (7) data folders for Data Upload options, including All
“ALL”, Scenes “SCEN”, Program 1 “Pr01”, Program 2 “Pr02”, Program 3
“Pr03”, Program 4 “Pr04”, and Set “SEt”.
1. Press and hold the RECORD BUTTON for three (3) seconds to
activate record mode. A red LED above the button will be lit
and the
LCD Window will display “1: REC”.
2. Press the UP BUTTON, until the LED WINDOW shows “4:232”. Press
the RECORD BUTTON, press the UP BUTTON until the LED WINDOW
shows “2:U.Pr”.
3. Press the RECORD BUTTON to access data upload, the LED WINDOW
will now show “ALL”, one of the seven (7) data folders in the DMX
Programmer.
4. Select the desired data folder you wish to backup on your PC.
5. Connect the DMX Programmer to the PC.
6. Select the version of Hyper Terminal that you created and saved to your
desktop. Click on the top menu bar and select “Capture Text”. A
dialogue box will appear allowing you to select a folder and name for
the data file you will send. Click “Start”, and Hyper Terminal will now
start the process of receiving the data file from your DMX Programmer.
7. Press the RECORD BUTTON, the LED WINDOW will show “SEND”,
which indicates it is sending the file.
8, If you succeeded in uploading the data file, the LED WINDOW will
DMX Programmer™ Dowloading and Uploading