


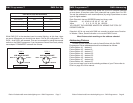


the RECORD BUTTON, press the UP BUTTON until the LED WINDOW
shows “3:d.Pr”.
4. Press the RECORD BUTTON to access data download, the LED
WINDOW will now show “ALL”, one of the seven (7) data folders in the
DMX Programmer.
5. Select the desired data file you wish to download from your DMX
Programmer.
6. On the DMX Programmer that you want to Upload data.
Press and hold the RECORD BUTTON for three (3) seconds to
activate record mode. A red LED above the button will be lit
and the
LCD Window will display “1: REC”.
7. Press the UP BUTTON, until the LED WINDOW shows “4:232”. Press
the RECORD BUTTON, press the UP BUTTON until the LED WINDOW
shows “2:U.Pr”.
8. Press the RECORD BUTTON to access data upload, the LED WINDOW
will now show “ALL”, one of the seven (7) data folders in the DMX
Programmer.
9. Select the desired data folder you wish to store the download.
10. Press the RECORD BUTTON on the unit you are downloading from. The
LED WINDOW will show “SEND” and the LED WINDOW of uploading
unit will show “rECE”.
11. If you succeeded in swapping data, the LED WINDOWs of both units
will show “good”, and will automatically exit from Record mode. If the
swap fails, the LED WINDOWs of both units will show “Err”. If this
occurs, check all connections and configurations, and try again.
DMX Programmer™ Downloading and Uploading
Elation Professional® www.elationlighting.com - DMX Programmer Page 22Elation Professional® www.elationlighting.com - DMX Programmer Page 21
show “good”, and will automatically exit from Record mode. If the
upload fails, the LED WINDOW will show “Err”. If this occurs, check all
connections and configurations, and try again.
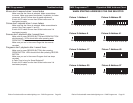
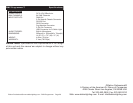
DATA DOWNLOAD
There are seven (7) data folders for Data Download options, including All
“ALL”, Scenes “SCEN”, Program 1 “Pr01”, Program 2 “Pr02”, Program 3
“Pr03”, Program 4 “Pr04”, and Set “SEt”.
1. Connect the DMX Programmer to the PC.
2. Press and hold the RECORD BUTTON for three (3) seconds to
activate record mode. A red LED above the button will be lit
and the
LCD Window will display “1: REC”.
3. Press the UP BUTTON, until the LED WINDOW shows “4:232”. Press
the RECORD BUTTON, press the UP BUTTON until the LED WINDOW
shows “3:d.Pr”.
4. Press the RECORD BUTTON to access data download, the LED
WINDOW will now show “ALL”, one of the seven (7) data folders in the
DMX Programmer.
5. Select the desired data file you wish to download from your PC.
6. Connect the DMX Programmer to the PC.
7. Press the RECORD BUTTON, the LED WINDOW will show “rECE” and
the RECORD LED will blink, which indicates it is receiving the file. You
can press the RECORD BUTTON at any time to quit this process.
8. On your PC, select the version of Hyper Terminal that you created and s
aved to your desktop.
9. Click on the “Transfer” menu in the menu bar, then select “Send text
file”. Find the drive and folder where the file is located, select the file
and click on “OPEN”.
10. If you succeeded in downloading the data file, the LED WINDOW will
show “good”, and will automatically exit from Record mode. If the
download fails, the LED WINDOW will show “Err”. If this occurs, check
all connections and configurations, and try again.
DATA SWAP BETWEEN DMX PROGRAMMERS
1. Use a RS-232 cable to connect two DMX Programmers.
2. On the DMX Programmer that you want to download data from.
Press and hold the RECORD BUTTON for three (3) seconds to acti-
vate record mode. A red LED above the button will be lit and the
LCD Window will display “1: REC”.
3. Press the UP BUTTON, until the LED WINDOW shows “4:232”. Press
DMX Programmer™ Downloading and Uploading