


Elation Professional® www.elationlighting.com - DMX Programmer Page 16Elation Professional® www.elationlighting.com - DMX Programmer Page 15
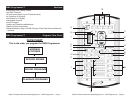
RESET ALL MEMORY:
This function will erase all scenes and program programs.
The unit must be off, to perform this function.
1. Press and hold down the SCENE 2 BUTTON, BANK BUTTON, and the
BLACKOUT BUTTON, and turn the power on.
DMX Programmer™ Reset All Memory
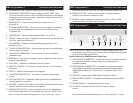
MANUAL RUN SCENES:
1. When power is first turned on, the unit is in manual scene mode.
2. Make sure AUTO & MUSIC LED’S BUTTONS are off .
3. Select the page
, using the UP and DOWN BUTTONS, that store
the scenes you wish to run.
4. Press the a SCENE BUTTON to run the scene.
MANUAL RUN PROGRAMS:
This function will allow you to manually step through all scenes in any
Program.
1. Execute a program by selecting one of the four PROGRAM BUTTONS.
2. Press the AUDIO/PREVIEW BUTTON, and tap the TAP/SYNC BUTTON
.
AUTO RUN PROGRAMS:
1. Select your desired program program by pressing any of the four
PROGRAM BUTTONS.
2. The program will now run according to the speed and fade time that
you set when you made the program.
3. If you would like to control the speed and fade time while your program
is running, you need to press and hold your desired PROGRAM
BUTTON and press the SPEED+FADE BUTTON. You can now let
go of the PROGRAM BUTTON, the green LED next to the PROGRAM
BUTTON should be flashing quickly.
4. Now when you press the SPEED+TIME BUTTON you will be able to
switch between Fade Time and Speed Time. When the button LED is
lit, the fader will control the Fade Time. When the LED is not lit, the
fader will control the Speed Time.
MUSIC RUN PROGRAMS:
1. Select your desired program by pressing one of the four PRO
GRAMMED BUTTONS.
2. Press the AUDIO/PREVIEW BUTTON.
3. Program will now run in sound active mode.
DMX Programmer™ Playback Scenes and Programs
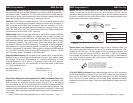
NOTE: The joystick will be pre-assigned to work with most American
DJ and Elation light fixtures. When using the controller with light fix-
tures other then American DJ and Elation, the joystick may have to be
assigned to those light fixtures. To assign the joystick follow the in-
structions below.
1. The fixture(s) must be connected to the DMX Programmer
.
2. Press and hold the RECORD BUTTON for three (3) seconds to
activate record mode. A red LED above the button will be lit
and the
LCD Window will display “1: REC”.
3. Press the UP BUTTON, the LED WINDOW will show “2:SEt”. Press the
RECORD BUTTON, the LED WINDOW will show “1:ASS”. Press the
RECORD BUTTON, again.
4. Now select the fixture or fixtures you want to assign the joystick to
control. To select multiple fixtures you must hold the GROUP BUTTON
and then select the fixtures.
5. The LED WINDOW will now show “C1:L1”. “C1” meaning Channel 1,
and “L1” meaning Output Channel 1.
6. Press the UP BUTTON to toggle through the Channel number and
Output Channel number. Press the UP BUTTON until the LED WINDOW
shows “PA:C-” (Pan Control). Press the DOWN BUTTON, to change the
output channel to whichever channel is the Pan channel on
your selected fixture. Press the UP BUTTON until the LED WINDOW
shows “tI:C-” (Tilt Control). Press the DOWN BUTTON, to
change the output channel to whichever channel is the Tilt channel on
your selected fixture. Press the RECORD BUTTON, If the channel patch
is successful, all LED’s will blink, and the LED WINDOW will
show “good”, then return to “C1:L1”.
NOTE: You must set both pan and tilt channels before saving. Saving
one at a time, will only save the last selected setting.
7. To exit Joystick Assignment, press the RECORD BUTTON for three (3)
seconds.
DMX Programmer™ Assignable Joystick