


11
Preparation Before Use
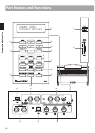
a POWER switch
This switch is used to turn the CA93/CA63 digital piano on/o.
Be sure to turn o the instrument after playing.
b MASTER VOLUME slider
This slider controls the master volume level of the CA93/CA63
digital piano’s built-in speakers or headphones, if connected.
c LCD display
The LCD display provides useful information such as the
currently selected sound name, settings values, and the status
of other functions when active.
* A protective plastic lm is attached to the display during production.
Please remove this lm before attempting to play the instrument.
d SPLIT button
This button activates the SPLIT function, dividing the keyboard
into upper and lower sections, and allowing separate sounds
to be assigned to each.
e MUSIC button
This button provides access to the built-in demonstration
songs, Piano Music pieces, Lesson and Finger Exercises, and
Concert Magic function.
f ARROWKEYS/FUNCTIONbutton
These buttons are used to navigate around the various menus
and screens, adjust values, and answer on-screen prompts.
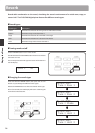
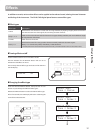
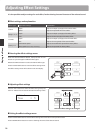
g EFFECTS button
This button is used to turn eects for the selected sound on/o,
to select the dierent eect types, and to adjust their settings.
h REVERB button
This button is used to turn reverb for the selected sound on/o,
to select the dierent reverb types, and to adjust their settings.
i SOUND SELECTION buttons
These buttons are used to select the sound(s) that will be
heard when playing the keyboard of the CA93/CA63 digital
piano. Multiple sounds are assigned to each category button,
and can be selected by pressing the same button repeatedly.
In addition, these buttons are also used to select Registration
memories, and control various other features.
j REGISTRATION button
This button is used to store and recall one of the eight
dierent registration memories. Each registration can store
sound, reverb and eects settings, as well as various other
panel options.
k METRONOME button
This button is used to turn the metronome function on/o,
and also to adjust the tempo, time signature (or beat), and
volume settings.
l PLAY/STOP button
This button is used to start/stop the playback of demonstration
songs, Piano Music pieces, and Lesson and Finger Exercises,
and to start/stop the recording and playback of recorder
songs, and MP3/WAV audio les.
m REC button
This button is used to record performances to internal memory
or a USB memory device as MP3/WAV audio les.
When using the Lesson or Finger Exercises function, this
button is also used to record practices, allowing comparison
with the built-in songs and etudes.
n LINE IN jacks
These jacks are used to connect the stereo output (Left/
Right 1/4" phone or 1/8” mini plug) from audio equipment,
computers, or other electronic instruments to the CA93/CA63
digital piano’s amplier and speakers.
When using the Left/Right 1/4" phone jacks, the input level
can be adjusted by using the LEVEL knob.
o LINE OUT jacks
These jacks are used to connect the stereo output (Left/Right
1/4” phone plug) of the CA93/CA63 digital piano to external
ampliers, mixers, recording devices, and similar equipment.
p USBTODEVICEport
This port allows USB memory devices to be connected to the
CA93/CA63 digital piano.
q USB TO HOST port
This port allows the CA93/CA63 digital piano to be connected
to a computer using a USB ‘B to A’ type cable in order to send
and receive MIDI data.
r MIDIIN/OUT/THRUjacks
These jacks are used to connect the CA93/CA63 digital piano
to external MIDI devices such as other musical instruments or
a computer in order to send and receive MIDI data.
s PHONES jacks
These jacks are used to connect stereo headphones to the
CA93/CA63 digital piano. Two pairs of headphones can be
connected and used simultaneously.