


91
Appendix
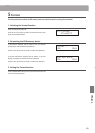
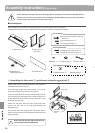
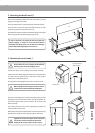
2. Attaching the back board d
Allow the assembled pedal board and side panels to stand
upright (vertically) on the oor.
Insert the back board d into the grooves of the side panels.
From the front, secure the top of the back board to the side
panels using the four short black screws g.
From behind, attach the bottom of the back board to the pedal
board using the four long black tapping screws h.
It may be necessary to adjust the left and right side
panels slightly in order to insert the back board
smoothly into the grooves. Be careful not to damage
the back board by applying too much force.
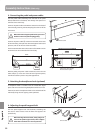
3. Mounting the main body a
Ensure that two or more people undertake the
following step of the assembly process.
Lift the main body a and carefully place it onto the stand.
Position the main body slightly towards the back of the stand,
to ensure that the guide screw in the front of the stand is
visible when viewed from above.
Gently slide the main body forward until it comes to a halt.
When lifting the main body onto the stand, be
careful not to catch/trap hands and ngers.
Attach the main body to the stand from below using the two
at-tipped screws with the at washer and spring washer e,
then from behind using the two washers j and two long
black screws f.
First, loosely attach all four screws, adjusting the position of
the main body on the stand.
When all four screws are attached and the main body is correctly
positioned on top of the stand, securely tighten all screws.
Tighten all screws securely to ensure that the
mainbodyisrmlyattachedtothestand.
Failingtodosomayresultinseriousinjury.
d
b
h
h
h
h
g
g
Guide screw
e
f
+
j
Lift onto stand,
slide forward