


section
90
Appendix
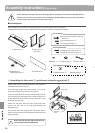
Assembly Instructions (CA63 only)
Please read these assembly instructions thoroughly before attempting to assemble the CA63 digital piano.
Please ensure that two or more people work on assembling the CA63 digital piano, especially when lifting
the main body of the instrument onto the stand in step 3.
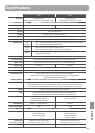
Included parts
Before attempting to assemble the CA63 digital piano, ensure that all parts below are included.
A Phillips-head screwdriver (not included) will also be required in order to assemble the instrument.
c Pedal board x 1
Pedal support bolt x 1
d Back board x 1
Screws (at tip)
e Screw (with at washer and spring
washer) x 2
f Screw (long, black) x 2
g Screw (short, black) x 4
k Cable clamp x 2 l Power cable x 1j Washer x 2
a Main body x 1 b Side panel x 2
(left, right)
Screws (pointed tip)
i Tapping screw (short, silver) x 4
h Tapping screw (long, black) x 4
Headphone hook x 1 Mounting screw x 2
m Headphonehookset x1
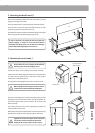
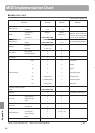
1. Assembling the side panels b, pedal board, and pedal support bolt c
Unfasten and extend the pedal connection cable attached to
the bottom of the pedal board c.
Insert the pedal support bolt approximately 1 cm into the
pedal board, using the hole shown in the diagram.
Attach the pedal board c to the left and right side panels b
using the temporary mounting screws located on either end
of the pedal board. Ensure that the correct side panel is used
for the left and right side.
Ensure that the pedal board and side panels make close
contact, and that there are no large gaps between the
assembled parts.
Insert the four short silver tapping screws i into the holes as
shown, and securely fasten the pedal board to the and left and
right side panels.
Ensurethattheleftandrightsidepanelsare
securelyfastenedtothepedalboard.
i
i
b
b
Pedal cable
Temporary
mounting
screw
Pedal support bolt hole