


8
Fade Track and Normalize Track have been added as
edit types.
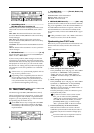
EditType: “FadeTrack”
This command creates a fade-in or fade-out in the IN–
OUT region of the fade-in destination track (“Dest-
Track”) data. When this is executed, the audio data of
the IN–OUT region will be smoothly faded in toward
the level at the OUT location.
When this is executed (“Exec.”), the fade-in desti-
nation track will be overwritten.
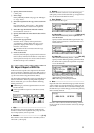
8. MODE.....................................................................
Select the fade curve with which the fade-in or fade-out
will be performed.
SelectFadeMode............................................. [A...F]
A type: This curve is ideal for conventional fade-in.
B type: This curve is ideal for creating cross-fades
where two tracks are faded-in/out at the identical
time location.
C type: This curve inverts the A curve, lengthening
the sound that is heard before the fade.
D type: Fade-out using the A type curve.
E type: Fade-out using the B type curve.
F type: Fade-out using the C type curve.
Press the “OK” button to finalize the selected fade
type.
Press the “Cancel” button to cancel the setting.
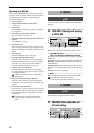
Fade-in procedure
As an example, here’s how to fade-in the IN–OUT
region of track 1.
1 Select the IN and OUT locations.
Select/assign the fade-in start and locations.
(→D16 p.70)
2 Select the Fade Track edit type.
In the [TRACK] “EditTrk” tab page, set “EditType”
to “FadeTrack.”
3 Select the fade curve.
Press the “Mode” button to access the dialog box.
For this example, select the “A type” curve, and
press the “OK” button to return to the [TRACK]
“EditTrk” tab page.
4 Select the fade-in destination track number.
Set “DestTrack” to track “1.”
5 Execute the fade-in.
Press the “Exec.” button, then reply to the “Are You
Sure?” confirmation. When the fade-in is com-
pleted, the display will indicate “Completed.”
Press the “OK” button.
6 Listen to the results.
Press the [IN/LOC1] key to play back from the IN
location, and check that the fade-in was performed
correctly.
You can use Undo to return the data to the state
before the operation was executed.
The time required by this editing operation
before the “Completed” display appears will
take proportionally longer as the specified
range (IN–OUT) is longer.
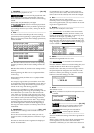
Fade-out procedure
Here’s how to fade-out the IN–OUT region of track 1.
1 Select the IN and OUT locations.
Select/assign the fade-out start and locations.
(→D16 p.70)
2 Select the Fade Track edit type.
In the [TRACK] “EditTrk” tab page, set “EditType”
to “FadeTrack.”
3 Select the fade curve.
Press the “Mode” button to access the dialog box.
For this example, select the “D type” curve, and
press the “OK” button to return to the [TRACK]
“EditTrk” tab page.
4 Select the fade-out destination track number.
Set “DestTrack” to track “1.”
5 Execute the fade-out.
Press the “Exec.” button, then reply to the “Are You
Sure?” confirmation. When the fade-out is com-
pleted, the display will indicate “Completed.”
Press the “OK” button.
6 Listen to the results.
Press the [IN/LOC1] key to play back from the IN
location, and check that the fade-out was per-
formed correctly. You can use Undo to return the
data to the state before the operation was executed.
p.56–
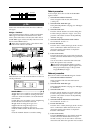
IN OUT
DestTrack
DestTrack
1 7
6
3
8
IN OUT
IN OUT