


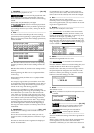


11
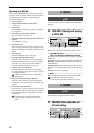
6 Specify the TO time location.
(→D16 p.70)
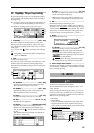
7 Select Copy.
In the [TRACK] “EditTrk” tab page, set “EditType”
to “Copy Track.”
8 Select the clipboard as the copy source track num-
ber.
For “SourceTrack,” select “Clip 1.” The number
indicates the number of tracks in the clipboard.
9 Select the copy destination and track number.
Set “DestTrack” to track “1.”
0 Specify the number of times that the data will be
copied.
Set “Times” to “1” copy.
A Execute the copy operation.
Press the “Exec.” button, and respond to the
“AreYouSure?” display. When the copy is com-
pleted, the display will indicate “Completed.”
Press the “OK” button.
The data will be overwritten onto the copy
destination track.
B Listen to the result.
Press the [TO/LOC3] key to play back from the TO
time location, and listen to the data to verify that it
was imported correctly. You can use Undo to return
the data to the previous condition.
P5 Export: Export a WAV file
Audio track data copied to the clipboard of the D16V2
can be exported to a WAV file (16 bit, 44.1 kHz, mono or
stereo) on a FAT 16 DOS formatted external SCSI drive.
(→p.20 “Note when using DOS format disks”)
Clip board data in 24 bit mode can be exported either as
16 bit or 24 bit data. When exporting 24 bit clipboard
data as 16 bit data, you can select whether dithering
will be performed.
If dithering is performed, quantization noise will
be less obvious.
It is not possible to export to a CD device (CD-R,
CD-RW).
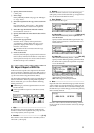
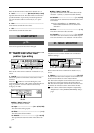
1. Clip#.......................................................................
This shows the state of the clipboard. # indicates the
number of tracks in the clipboard. Only Clip1 (monau-
ral) or Clip2 (stereo) can be exported.
2. DriveList ........................................................[A...G]
Select the drive. For details on drive numbers, refer to
“Drive ID” (→D16 p.47).
3. Rename..................................................................
Press the “Rename” button to access the dialog box,
and specify a name for the WAV file. Up to eight charac-
ters can be used in the WAV file name.
4. Exec. (Execute)........................................................
Execute the WAV file export.
4a. Export Size ..................................[16 bit, 24 bit]
This can be selected only if the clipboard con-
tains 24 bit data.
Specify whether the 24 bit data copied to the clip-
board will be exported as a 16 bit WAV file or as a
24 bit WAV file.
4b. Dither SW.......................................... [ON, OFF]
This can be selected only for 24 → 16 bit.
Specify whether dithering will be performed when
the 24 bit data copied to the clipboard is exported
as a 16 bit WAV file.
ON: Dithering will be performed in order to make
quantization noise less obtrusive.
OFF: Dithering will not be performed.
5. Date .......................................................................
Input the date of the WAV file being exported. Press the
“Date” button to access the dialog box, and specify the
date on which the WAV file was created. Directly press
the date that you wish to change, and use the [VALUE]
dial to modify the date.
Press the “OK” button to finalize the setting. Alterna-
tively, press the “Cancel” button to cancel any changes
you made.
1
5
2 43