


4
Change the “Tempo map” explanation in “Setting the
tempo.”
Tempo map
Tempo Map
switches the tempo, time signature, and
rhythm pattern at the specified measure.
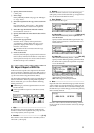
1
Specify Tempo Map as the tempo source.
• Select the [TEMPO/RHYTHM] “SetUp” tab
page.
• Press the “Rhythm” button to turn rhythm on.
• Press “T
empoSource,” and use the [VALUE] dial
to select “
TempoMap
.”
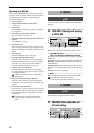
2
At the beginning of the song, specify the initial
tempo in tempo map “001.”
Tempo map “
001
” is located at the beginning of the
song, and specifies the initial tempo. Tempo maps
“
002
”–“
200
” can be placed in successive measures
of the song to change the tempo.
• Select the [TEMPO/RHYTHM] “TmpMap” tab
page.
• Select “T
empoMap,” and use the [VALUE] dial
to select tempo map “
001
.”
• Press the “Edit” button to access the “Select
TempoMap001 Param” dialog box.
• Specify the tempo in “T
empo,” the time signa-
ture in “Beat
,” and the rhythm pattern in
“Rhythm
.”
It is not possible to change the starting location
(Start Measure) of tempo map “
001
.” You can
change only the ending location (End Measure).
• After you have finished making the settings,
press the “OK” button.
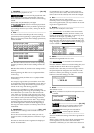
3
Add a tempo map at any point in the song where
you want to change the tempo, time signature, or
rhythm pattern.
• Press the “New” button to display “Select
TempoMap002 Param.”
• In the “Meas
” area, specify the starting location
(Start Measure) for which the tempo map will be
created, and the ending location (End Measure).
Specify the tempo in “T
empo,” the time signa-
ture in “Beat
,” and the rhythm pattern in
“Rhythm
.” To add the tempo map by overwrit-
ing the previous data, turn
off
the “Insert” but-
ton.
• Press the “OK” button to add the tempo map.
The map numbers will automatically be reas-
signed from the beginning to the end of the
song.
By adding a tempo map and using “Rhythm
” to
change the rhythm pattern, you can create drum
patterns for an entire song, including an intro, fill-
in, and ending.
It is now possible to backup and restore song data
using a CD-R or CD-RW.
p.40–
p.43–