


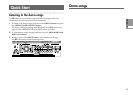


19
Editing
Basic editing procedures
On the R3 there are two basic ways for you to create your own sound(s).
• Select a program that is close to the sound you want to create, and tweak
the parameters of that program until it sounds the way you would like
it to.
• Start from an initialized program (“blank slate”), and create the sound
from scratch
All of editable parameters are organized into sections, and the param-
eters in each section are accessed by selecting different edit pages. When
creating a sound from scratch, notice that the edit pages are organized in
a way that follow the logical order of editing. You can turn the dial to
step through these sections in the appropriate order. Broadly speaking,
the procedure is as follows.
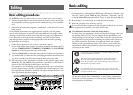
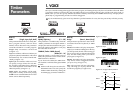
1
Select the program that you want to start from. (☞p.12)
If you want to start from scratch, execute the Initialize operation. (☞p.75)
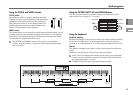
Use the TIMBRE SELECT [TIMBRE1], [TIMBRE2], or [VOCODER]
buttons to select the part that you want to edit.
2
Turn the [PAGE] dial to select the edit page that includes the parameter
you want to edit. Consider how the current program differs from the sound
you have in mind, and select the parameter that you want to edit.
3 Edit the value of the parameters available in the selected page, using
knobs [1], [2], [3], and [4]. The parameter controlled by each knob is
shown in the sub-display located above each knob.
For example if you’re editing a synth program, and you’ve selected the
8. Filt-A page in step 2, knob [1] will adjust the cutoff frequency, knob
[2] will adjust the resonance, knob [3] will adjust the filter balance, and
knob [4] controls the filter routing.
2
3
Go ahead and try editing the 15. EG2 page ozBameters “Attack2” and
“Decay2” (☞p.41), the 3. Pitch-A page parameter “Portamnt” (☞p.25),
or the 29. Insert FX1 page parameter “Type” to hear the result (☞p.49).
4
Repeat steps 2–3 as necessary to create the desired sound.
5
Write the program into memory. (☞p.74)
If you select another program or turn the power off before you write
the program into memory, your edits will be lost.
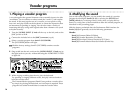
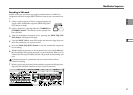
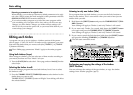
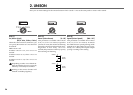
The difference between Catch and Jump modes
In some cases, the parameter values won’t seem to change when you
are turning knobs [1]–[4]. This can happen if the “KnobMode” (41.
Global-B page) is set to Catch. In the Catch mode, the physical knob
must be turned to the position matching the stored value (shown by
the LEDs around the perimeter of each knob) before any further
editing of that parameter can begin. This allows you to make fine
adjustments without any sudden or unnatural-sounding “jumps”
occurring in the sound.
For example, suppose that before you begin editing, the knob
is in the position shown at left.
The actual value of this parameter is saved at the position
shown by the triangle in the diagram at left. In the Catch
mode, the parameter value will not change until you turn the
knob all the way to that position.
Once the knob reaches the position of the actual saved value, the
knob and parameter value will begin changing in tandem, and you
can begin to edit the value.
On the other hand, if the “KnobMode” is set to Jump, turning the
knob will cause the parameter’s value to jump immediately to the
actual position of the knob.
Basic editing