39
One of Mackie Designs’ primary product phi-
losophies is to make its mixers as multi-purpose
as possible to make them more affordable. This
sounds like a contradiction in terms, but it isn’t.
By creating consoles JUST for recording and
other models JUST for PA, other companies com-
plicate the manufacturing process and reduce
their economies of scale.
We designed the 8•Bus Series from the
ground up for both recording and PA sound rein-
forcement applications. If you have any doubt as
to the durability of your new console, just think
of how many smaller Mackie mixers have logged
literally millions of air miles on grueling tours
(and how many vintage Tapco mixers that Greg
Mackie designed are still around and in day-to-
day use).
From a features standpoint, Mackie 8•Bus Se-
ries consoles are easy to configure for public
address and sound reinforcement applications,
whether you are mixing the house, stage monitors
or both at once. Use the L/R main mix buses and
your main L/R outputs as your main signal path.
If you want a headphone cue mix, either
patch the Control Room outputs to a suitable
headphone amplifier, or select MONITOR as the
source for Phones 1 or Phones 2. This will allow
you to listen to any source you can select for the
Control Room. You can also use the solo buses as
headphone cue. If you prefer, you can modify the
solo circuits for PFL (Pre-Fade Listen).
SETUP
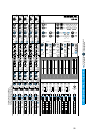
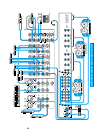
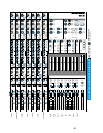
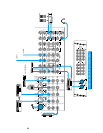
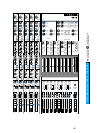
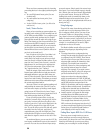
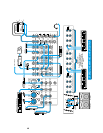
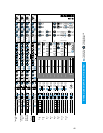
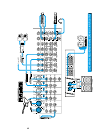
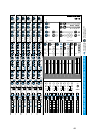
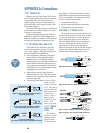
Refer to the STEREO LIVE MIX drawings on
page 42 and 43.
You should normally use the L/R Mix buses as
your Main or House feed. Patch out from the L/R
outputs (peferbly the balanced XLR outputs)
into the input to your amp stack (usually your
House graphic equalizer).
Any of the AUX buses can be used to feed a
stage monitor mix, but AUX Send 1 and 2 are
balanced, so they would be the best choice for
several different stage monitor mixes. Set the
AUX Sends in each channel to PRE and patch the
AUX Send outputs to the appropriate amplifiers.
If you need to provide a simultaneous mix for
a stereo recording, use the MIX-B buses as
described in MAKING A SIMULTANEOUS
RECORDING.
SECTION 5:
PA AND SOUND REINFORCEMENT APPLICATIONS
WITH THE MACKIE 8•BUS CONSOLE
Text continued on Page 44
FOLLOW THIS SENSITIV-
ITY ADJUSTMENT PROCE-
DURE FOR EACH CHANNEL
IN USE:
1. ■■ Assign signal to channel fader:
• If channel will be used with a micro-
phone, MIC/LINE switch should be up &
FLIP switch should be up.
• If channel will be used with line input,
MIC/LINE switch should be down &
FLIP switch should be up.
2. Set channel strip controls as follows:
■■ TRIM pot all the way counterclockwise
(+4dB)
■■ AUX SEND controls all the way counter-
clockwise (off)
■■ EQ switch up
■■ LOW-CUT switch either on or off
(on recommended for mic inputs)
■■ Channel fader at UNITY
■■ PAN pot hard left or right
■■ SOLO switch down
3. ■■ Make appropriate “noise” into the channel
input. For example, have a performer play/
sing/strike something or someone, etc. at
the level they’re going to record or perform.
Don’t just play a single sustained note,
but rather, jam away as you would be during
recording or performance.
4. The channel’s –20dB LED should light. The L/R
main meters will show the actual internal
operating level of soloed signals. Now you will
optimize levels.
5. ■■ Adjust the TRIM control clockwise to get
peaks that regularly hit 0dB on the L/R
meters.
6. If desired (optional):
■■ Press the EQ switch in.
■■ Adjust the channel strip’s EQ to about what
you will be using during the session.
■■ Re-perform Step 5.
7. ■■ Return the channel strip’s SOLO button to
its up position, and set the PAN pot back
where you found it.
8. ■■ Repeat Steps 1-7 on the next channel that is
being used.
PA
&
SR


