


13
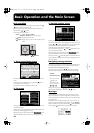
Panel Descriptions
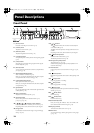
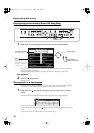
Rear Panel
1
LCD Out Connector
Connect the cable of the music stand to this connector. (p. 9)
2
MIDI Out/In connectors
These can be connected to an external MIDI device to exchange
performance data. (p. 46)
* There is also a MIDI In connector on the bottom panel. The two
MIDI In connectors cannot be used simultaneously.
3
Pedal connector
Connect the pedal cable of the stand to this connector. (p. 9)
4
Input jacks
These jacks can be connected to another sound generating
device or an audio device, so that the sound of that device will
be output from the HPi-5’s speakers. (p. 46)
5
Output jacks
These jacks can be connected to your audio system to enjoy
more powerful sound. They can also be connected to a tape
recorder or similar device in order to record your performance
on a cassette tape. (p. 46)
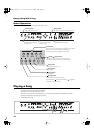
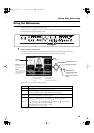
Bottom Panel
1
MIDI In connector
An external MIDI device can be connected
here to receive performance data. (p. 46)
* There is also a MIDI In connector on the rear
panel of the HPi-5. The two MIDI In
connectors cannot be used simultaneously.
2
Phones jacks
A set of headphones can be connected here.
(p. 9)
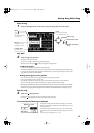
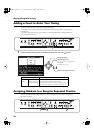
Music Stand
1
Display
This screen displays the musical score of an internal song or
disk song, and also displays various settings.
* The explanations in this manual include illustrations that depict
what should typically be shown by the display. Note, however,
that your unit may incorporate a newer, enhanced version of the
system (e.g., includes newer sounds), so what you actually see
in the display may not always match what appears in the
manual.
fig.contrast
2
[Contrast] knob
This knob adjusts the brightness of the screen. (p. 10)
1 2 3 4 5
1
2
Front of the music stand
1
Rear of the music stand
2
HPi-5_e.book 13 ページ 2004年12月21日 火曜日 午後12時46分