


120
Chapter 6 Creating and Editing Songs
Chapter 6
Composing an
Accompaniment By Entering
Chords (Chord Sequencer)
You can enter a chord progression and choose the places
where the accompaniment pattern will change to create an
accompaniment for a song. This feature is called “Chord
Sequencer.”
Thanks to the chord sequencer, you can create an
accompaniment ahead of time and play along with your
right hand.
1. Press the [Menu] button and watch the indicator light
up.
The Menu screen appears.
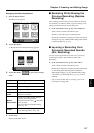
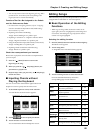
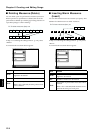
2. Touch <Chord Sequencer>.
The screen like the one shown below is called “Chord
Sequencer screen.”
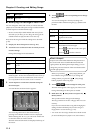
fig.d-chordseq.eps_50
3. Press a Music Style button or the touch screen to select
a Music Style (p. 50).
4. Touch <Exit>.
You are returned to the Chord Sequencer screen.
5. Enter the chord progression and the accompaniment
pattern.
Refer to “Inputting Chords with the Chord Sequencer.”
6. When you have finished inputting all the data, touch
<Execute>.
The accompaniment you’ve composed is registered at “0:
New Song.”
When storage of the data is complete, return to the Menu
screen.
Now, press the [ (Play/Stop)] button, and try
playing the melody along with the accompaniment you
created.
* Songs you’ve created are discarded as soon as you turn off the
power. If you do not want to delete the song, save it to a floppy
disk or to user memory. Refer to “Saving Songs” (p. 101).
Inputting Chords with the Chord Sequencer
1. Use the [+] [-] buttons or the dial to move the cursor to
the input position.
Use the [ (Bwd)] and [ (Fwd)] buttons to move
the cursor one measure at a time.
2. Enter the chord progression and the changes in the
accompaniment pattern and arrangement.
Just as when performing with Automatic
Accompaniment, press the keys to specify a chord, and
press a button to select the accompaniment pattern (p.
57). You can change the Style Orchestrator with the
Performance Pads (p. 58).
3. Touch <Ins> once to insert one measure before the
measure where the cursor is currently positioned.
If you touch <Del>, the measure where the cursor is
currently positioned is deleted, while the measures that
follow are moved forward.
To remove what you have input, move the cursor to the
position with input you want to delete, then touch
<Clear>. This deletes the entered setting.
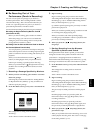
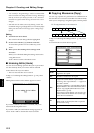
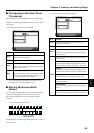
Display Description
Ins
One measure is inserted before the measure
where the cursor is positioned.
Del
The measure in which the cursor is posi-
tioned is deleted.
Chords
Allows input of chords without playing the
keyboard. Refer to “Inputting Chords with-
out Playing the Keyboard” (p. 121).
All Clear Deletes all of the data that’s been input.
Clear Deletes the data at the cursor position.
Execute
Records the input chord progression.
Touch this icon when you have finished in-
putting all of the chords.
This is the end of the song. When
continuing to add input, insert
measures by touching <Ins>.
This is the “cursor.” The cursor
shows where the chord change
or other information is input.
This indicates the position where the
accompaniment pattern (Division) or
the Style Orchestrator changes.
Change the accompaniment arrangements
Move the cursor
Select the accompaniment pattern (Division)