


9
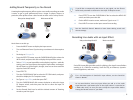
Here’s how to record live audio with an input effect:
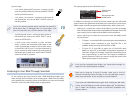
Press the INPUT button to display the Input screen.
1
Turn on Phantom Power if you’re using a condenser mic that requires 2
it.
Set Assign to
3 To Input FX.
Press the EFFECTS button, turn the CURSOR/VALUE dial to select the
4
IN FX switch, and press the dial to display the Input Effect screen.
Select the desired input effect on the display’s top line.
5
Adjust the input effect’s parameters as desired.6
Press EFFECTS to return to the In/Out Routing screen.7
Turn the CURSOR/VALUE dial to select the TO COM switch, and press 8
the dial to display the To Computer screen.
Set Type to
9 Input Effect, and then press EFFECTS.
Turn the CURSOR/VALUE dial counter-clockwise to select the Input
10
FX Output switch, and then press the dial to show the Input FX
Output screen.
Set Output Level to 127 unless you have some specific reason for
11
lowering it—this is, in essence, your DAW recording level setting.
Set Reverb Send Level and Chorus Send Level as desired to temporarily
12
add reverb or chorus, respectively, to your signal during recording.
These effect won’t be recorded in the DAW—they’re strictly for
listening purposes.
See the SonicCell Owner’s Manual to learn about editing reverb and
chorus settings.
Press EFFECTS, turn the CURSOR/VALUE dial to select the MFX3 LOC 13
switch, and then press the dial.
On the MFX3 Location screen, make sure Type is set to
14 TG.
Press INPUT to return to the Input screen for recording.
15
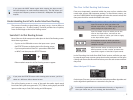
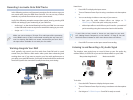
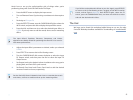
Recording Live Audio Through SonicCell’s Multi-FX
What you hear through SonicCell What’s sent to the DAW
Input Eect
MFX3
Input Eect
MFX3
with optional
Reverb and Chorus
DAW
output
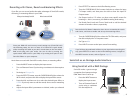
Press the INPUT button to display the Input screen.1
Turn on Phantom Power if you’re using a condenser mic requiring it.2
Set Assign to 3 To Input FX.
Press the EFFECTS button, turn the CURSOR/VALUE dial to select the
4
IN FX switch, and press the dial to display the Input Effect screen.
Press the dial, and then turn it to select the desired input effect, or
5
0:THRU if you only want to add the multi-effect.
Adjust the input effect’s parameters as desired, unless you selected
6
0:THRU.
Press EFFECTS to return to the In/Out Routing screen.
7
Turn the CURSOR/VALUE dial to select the TO COM switch, and press 8
the dial to display the To Computer screen.
Set Type to
9 Input Effect, and then press EFFECTS.
Turn the CURSOR/VALUE dial counter-clockwise to select the Input
10
FX Output switch, and then press the dial to show the Input FX
Output screen.
Set Output Level to 127 unless you have some specific reason for
11
lowering it—this is, in essence, your DAW recording level setting.
Set Reverb Send Level and Chorus Send Level as desired to temporarily
12
add reverb or chorus, respectively, to your signal during recording.
These effects won’t be recorded in the DAW—they’re strictly for
listening purposes.