


21
MZ-R909
>
key
.
key
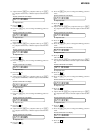
Overall adjustment mode
(Title display)
CD overall
adjusting
CD overall
adjustment
OK
MO overall
adjusting
MO overall
adjustment
OK
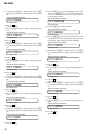
CD overall
adjustment
NG
MO overall
adjustment
NG
All item
OK
Protect switch
ON
Protect switch
OFF
Jog dial (down) or
[DISPLAY] key on the remote commander
NG item exists
or
x
key
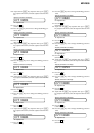
NG item exists
or
x
key
x
key
x
key
x
key
x
key
x
key
Jog dial (up) or
[PLAYMODE] key on the remote commander
x
key
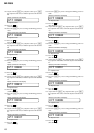
[Test mode $display check mode%]
N
key
N
key
Electrical
offset
adjustment
Power supply
adjustment
auto item feed
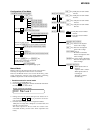
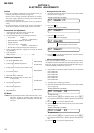
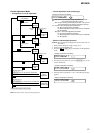
Overall Adjustment Mode
• Configuration of overall adjustment
Note: Adjust the CD first, when performing adjustment.
• Overall adjustment mode (title display)
000 Assy**
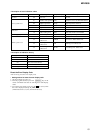
Remote commander LCD display
: (Disc mark) At end of power supply adjustment: Outside lit
At end of electrical offset adj.: Inside lit
Note: On the set having microcomputer version 1.000, the disc
mark is displayed on the remote commander LCD only.
**
: Left side = MO overall adjustment information
F*
: MO overall adjustment completed
1*
: Manual adjustment exists (overall adj. not completed)
0*
: Not adjusted
Right side = CD overall adjustment information
F*
: CD overall adjustment completed
1*
: Manual adjustment exists (overall adj. not completed)
0*
: Not adjusted
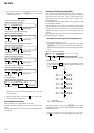
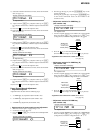
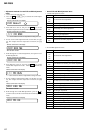
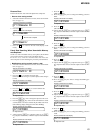
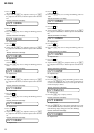
• Electrical offset adjusting method
Caution: The electrical offset adjustment must be made with no
disc loaded.
1. Make sure that the power supply voltage is 3 V.
2. Set the test mode (see page 12).
3. Press the . or [VOL--] key to activate the overall adjustment
mode.
4. Turn the jog dial (down), or press the [DISPLAY] key on the
remote commander.
5. Electrical offset adjustment is over, if the following display
appears.
000 Assy11
Remote commander LCD display
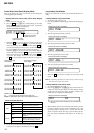
035 Ofst**
Remote commander LCD display
000 OfstOK
Remote commander LCD display