


5
MZ-R909
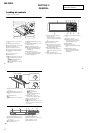
• This set can be disassembled in the order shown below.
3-1. DISASSEMBLY FLOW
SECTION 3
DISASSEMBLY
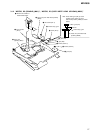
Note: Follow the disassembly procedure in the numerical order given.
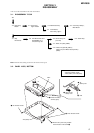
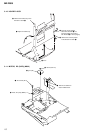
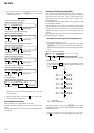
3-2. PANEL ASSY, BOTTOM
3-2. Panel Assy,
Bottom
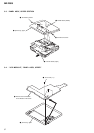
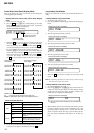
3-3. Panel Assy,
Upper Section
Set
3-4. “LCD Module”,
“Panel Assy, Upper”
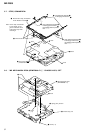
3-6. “Case Assy, Battery”,
“Main Board”
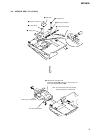
3-8. “MD Mechanism Deck
(MT-MZR909-171)”,
“Chassis Assy, Set”
3-7. Strip,
Ornamental
3-5. Main Board Assy
3-9. Service Assy, OP
(LCX-4R)
3-10. Holder Assy
3-11. Motor, DC (Sled) (M602)
3-12. “Motor, DC (Spindle) (M601)”,
“Motor, DC (Over Write Head Up/Down)
(M603)”
S801
1
Open the lid,
battery case.
4
Close the battery
terminal (plus).
6
Remove the “panel assy, bottom”
in the direction of the arrow
A
.
knob (hold)
3
lid,
battery cas
e
2
claw
A
5
two ES lock screws
5
three ES lock screws
Note: On installation,
adjust the position of both
switch (S801) and knobs(hold).