


23
MZ-R909
Resume Clear
Perform the Resume clear when all adjustments completed.
• Resume clear setting method
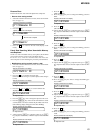
1. Select the manual mode of the test mode, and set item number
043 (see page 13).
2. Press the X key.
3. Press the x key to return to the test mode (display check
mode).
Patch Data Rewriting When Nonvolatile Memory
was Replaced
On this set, if the nonvolatile memory was replaced, the modified
program data must be written to the nonvolatile memory.
In such a case, write the modified data that meets the
microcomputer version following the procedure provided below.
• Modified data writing method (version 1.000)
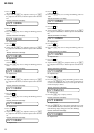
1. Select the manual mode of the test mode, and set item number
022 (see page 13).
2. Press the
X key to initialize the patch data.
(The modified data writing is over, if the adjusted value changes
to DD)
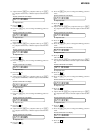
3. Press the N key or > key to set item number 023.
4. Press the [VOL+] key once to change the adjusted value to 01.
5. Press the [DISPLAY] key on the remote commander for several
seconds (about 3 seconds) to activate the patch data write mode.
(The following display will appear where 00 is blinking)
6. Adjust with the [VOL+] key (adjusted value up) or [VOL--]
key (adjusted value down) so that the adjusted value becomes
16.
7. Press the
X key.
(0FF8 is blinking)
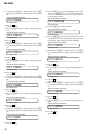
8. Press the [VOL+] key once to change the blinking portion to
0FF9.
9. Press the x key.
(00 is blinking)
10. Adjust with the [VOL+] key (adjusted value up) or [VOL--]
key (adjusted value down) so that the adjusted value becomes
0E.
11. Press the X key.
(0FF9 is blinking)
12. Press the [VOL+] key once to change the blinking portion to
0FFA.
13. Press the x key.
(00 is blinking)
14. Adjust with the [VOL+] key (adjusted value up) or [VOL--]
key (adjusted value down) so that the adjusted value becomes
03.
15. Press the
X key.
(0FFA is blinking)
16. Press the [VOL+] key five times to change the blinking por-
tion to 0FFF.
17. Press the x key.
(00 is blinking)
18. Adjust with the [VOL+] key (adjusted value up) or [VOL--]
key (adjusted value down) so that the adjusted value becomes
DF.
19. Press the X key.
(0FFF is blinking)
20. Press the [VOL+] key once to change the blinking portion to
1000.
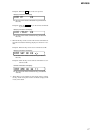
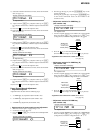
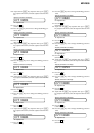
043 Resume CC
Remote commander LCD display
043 Res***
043 ResClr
Remote commander LCD display
Resume clear complete
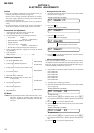
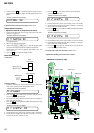
023 Patch00
Remote commander LCD display
00
: Adjusted value
023 0FF800
Remote commander LCD display
00
: Adjusted value
023 0FF816
Remote commander LCD display
16
: Adjusted value
023 0FF900
Remote commander LCD display
00
: Adjusted value
023 0FF90E
Remote commander LCD display
0E
: Adjusted value
023 0FFA00
Remote commander LCD display
00
: Adjusted value
023 0FFA03
Remote commander LCD display
03
: Adjusted value
023 0FFF00
Remote commander LCD display
00
: Adjusted value
023 0FFFDF
Remote commander LCD display
DF
: Adjusted value
022 PatClr CC
Remote commander LCD display
022 ***SDD
Remote commander LCD display
DD
: Adjusted value
023 100000
Remote commander LCD display
00
: Adjusted value