9
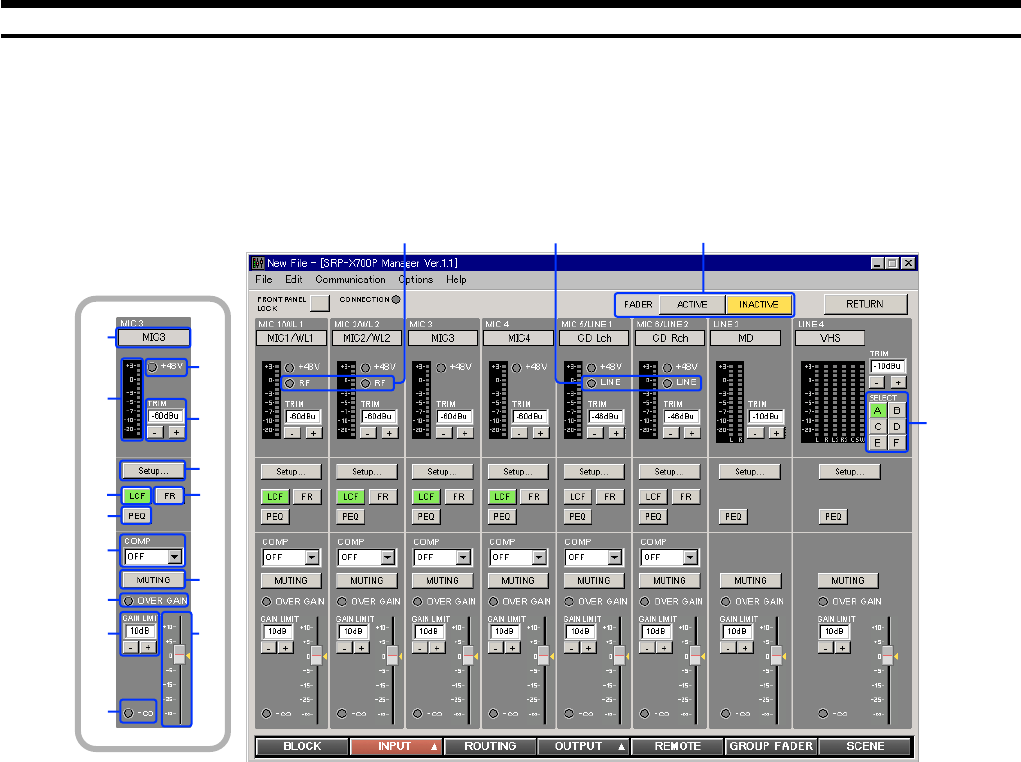
1.2 INPUT Screen
You can set parameters of the input block of the SRP-X700P from the INPUT screen.
1.2.1 INPUT OVERVIEW Screen
This screen corresponds to the input module of the audio mixer. This screen enables you to set the following.
1 INPUT index
Displays the index that is input on the BLOCK screen.
2 INPUT level meter
Displays the input signal level after the TRIM adjustment is
complete with the VU response.
3 +48 V indicator
The +48 V indicator lights in red when the +48 V button on
the rear of the SRP-X700P is turned on.
4 RF indicator
The RF indicator lights in green when the wireless tuner unit
installed in the SRP-X700P receives the RF signal. As long as
this indicator is on, this system selects the wireless tuner signal.
5 LINE indicator
The LINE indicator lights in green when the MIC/LINE select
button on the rear of the SRP-X700P is set to the LINE
position.
6 TRIM controls
The TRIM controls enable you to adjust the reference input
level of each input channel.
Each click of the [+] or [--] button increments or decrements the
reference input level by 1 dB. The adjustment range of MIC1/
WL1, MIC2/WL2, MIC3 and MIC4 is –60 dBu to –45 dBu. The
adjustment range of LINE3 and LINE4 is –10 dBu to 0 dBu.
The adjustment range of MIC5/LINE1 and MIC6/LINE2 is
–60 dBu to –45 dBu when MIC is selected or –10 dBu to +5 dBu
when LINE is selected. You can also enter numerical values
directly.
It is recommended to adjust the TRIM controls so that 0 VU of
the INPUT level meter lights often.
qj
qg
q;
qs
7
6
3
8
qa
qf
1
2
9
qd
qh
qk
45
7 Setup.. button
By clicking the Setup button, the display jumps to the INPUT
EQ screen where you can set the low-cut filter, feedback
reducer and parametric equalizer.
8 LCF (Low-Cut Filter) button
Each press of this button toggles the low-cut filter between on
and off. This button lights in green when pressed on. The LCF
removes low-frequency components such as blowing noise and
makes the sound clear.
9 PEQ (Parametric Equalizer) button
Each press of this button toggles the parametric equalizer
between on and off. This button lights in green when pressed
on. To set the PEQ, click on the 7 Setup.. button.
0 FR (Feedback Reducer) button
Each press of this button toggles the feedback reducer that is
set on the INPUT EQ screen between on and off. This button
lights in green when pressed on. To set the FR, click on the
7 Setup.. button.
qa COMP (Compressor) setup box
This function compresses the dynamic range of the input
signal that affects the unity sound volume. The compressor
can be set in three steps of SOFT, MID or HARD.
When the AUTOMATIC MIXER is turned ON, the
compressor is set automatically and the manual COMP setup
is disabled.
qs MUTING button
Pressing this button mutes the input signal of each channel.
The MUTING button lights in red when muted.


