


112
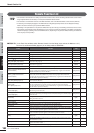
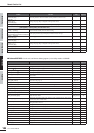
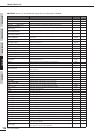
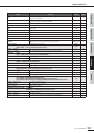
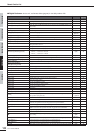
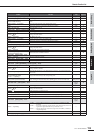
Remote Function List
01X Owner’s Manual
Before Using Basics Section AppendixGetting Started Reference
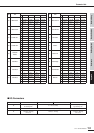
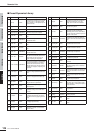
■ Digital Performer: On the 01X, set Remote Select (page 87) in the Utility mode to “DP.”
Button Function LED
Notes
(page 114)
In all modes:
[SHIFT]+[PAN]
Calls up the Mode list display.
—
[SHIFT]+[NAME/VALUE]
Turns the Meter indication on or off.
—
[SHIFT]+[REMOTE]
Enters the mode for Multi Part Editor Remote operation. Press [REMOTE] button to can-
cel the mode.
flashes *5
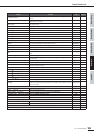
[SEL] (in normal status)
Selects a channel.
lights/goes out *2
[SHIFT]+[SEL] (in normal status)
Selects multiple channels.
lights/goes out *2
[SEL] ([SEL] flashes)
Fader touch-out (page 15)
flashes ➝
goes out
[SEL] ([AUTO EDIT] lights)
Fader touch-in (page 15)
flashes
[ON] (in normal status)
Turns each channel off or on (mutes/unmutes the signal).
lights/goes out *2
[ON] ([SOLO] lights)
Sets Solo for each channel to on or off.
lights/goes out *2
[ON] ([REC RDY] lights)
Sets the REC RDY of each channel to on or off.
lights/goes out *2
[AUTO EDIT]
Changes the function of the [SEL] button to the touch-in function. This button flashes
during automation touch-in.
lights
[SOLO]
Changes the function of the [ON] button to the Solo function.
lights
[REC RDY]
Changes the function of the [ON] button to the REC RDY function.
lights
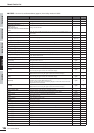
[AUTO R/W] (while being pressed)
Indicates the automation condition of the channel in the LCD.
• READ.......Automation = TOUCH
• READ.......Automation = LATCH
lights *38
[AUTO R/W]+[SEL]
Switches the automation Read function on/off, and changes automation mode to Touch.
lights *36
[GROUP] (while being pressed)
Indicates the Group to which the fader is assigned.
—
[GROUP] and the currently lit [SEL]
Releases the Group assignment.
—
[SHIFT]+[GROUP]
Assigns the selected channels to a Group.
—
[AUDIO]/[INSTRUMENT]/
[MIDI]/[BUS/AUX]/[OTHER]
Displays the Mixer window
—
BANK [</>]
Scrolls through the track indication every eight channels.
—
[SHIFT]+BANK [</>]
Scrolls through the track indication channel-by-channel.
—
[LOOP]
Turns Loop on or off.
—
[F1] – [F8]
No function
—
[SHIFT]+[F1]
Displays the Track Overview.
—
[SHIFT]+[F2]
Displays the Mixer window
—
[SHIFT]+[F3]
Displays the Event List window for the selected channel.
— *23
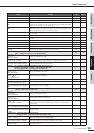
[SHIFT]+[F4]
Closes the current window.
—
[SHIFT]+[F5]
Displays the MIDI Edit window.
— *23, 24
[SHIFT]+[F6]
Displays the Sequencer Editor window.
—
[SHIFT]+[F7]
Displays the Soundbites window.
—
[SHIFT]+[F8]
No function
—
[UNDO]
Executes the Undo operation.
—
[SHIFT]+[UNDO]
Executes the Redo operation.
—
[SAVE]
When the lamp lights, press this so that the lamp flashes. Press this again to execute the
Save operation (lamp turns off).
lights ➝ flashes
➝ goes out
[MARKER]
Turns the Marker on or off.
—
[SHIFT]+[MARKER]
Opens the Marker Option window.
—
[r]
Press to continuously rewind. Press again to rewind more quickly. When the Marker is
turned on, this operation moves the song position to the previous Marker.
—
[SHIFT]+[r]
Moves the song position to the top of the song.
—
[f]
Press to continuously fast-forward. Press again to fast-forward more quickly. When the
Marker is turned on, this operation moves the song position to the next Marker.
—
[■]
Stops recording or playback.
—
[>]
Press to start playback.
lights
[●]
Press this to start song recording. The [>] (Play) and [●] (Rec) lamp are turned on dur-
ing recording.
lights
[ZOOM]
Switches between Scroll (lamp lights), Zoom (lamp is off), and Nudge (lamp flashes).
goes out ➝
lights ➝ flashes
FOOT SWITCH 1
Controls the function set in the Preferences in Digital Performer.
—
FOOT SWITCH 2
Controls the function set in the Preferences in Digital Performer.
—
[SCRUB]
Turns Scrub on and off. When turned on, you can use the dial to move the song position.
lights *25