


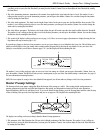
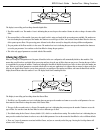


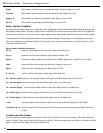
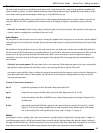
The display is now telling you three more things about the Chorus parameters.
1. The Dual Chorus has two delay circuits. This is the delay time of the first delay in the Chorus effect. The number one icon is indicating that
you must press the number one button to access the Delay A parameter. You can then rotate the Data Wheel to change the Delay time of
the first Delay.
2. This is the delay time of the second delay in the Chorus effect. The number three icon is indicating that you must press the number three
button to access the Delay B parameter. You can then rotate the Data Wheel to change the Delay time of the second Delay.
4. There are 5 pages of parameters associated with the Chorus, and you are currently on the fourth page. Pressing the Next Page button will
advance to the fifth page.
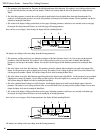
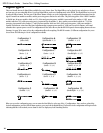
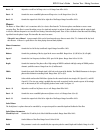
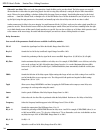
Once the fifth page of parameters has been accessed, the display will look something like this:
The display is now telling you five more things about the Chorus parameters.
1. This is the Output Level of the first Chorus circuit in the Dual Chorus effect. The number one icon is indicating that you must press the
number one button to access the Output Level A parameter. You can then rotate the Data Wheel to change the Output Level of the first
Chorus circuit.
2. This is the Pan position of the first Chorus circuit in the Dual Chorus effect. The number two icon is indicating that you must press the
number two button to access the Pan A parameter. You can then rotate the Data Wheel to change the Pan position of the first Chorus
circuit.
3. This is the Output Level of the second Chorus circuit in the Dual Chorus effect. The number three icon is indicating that you must press
the number three button to access the Output Level B parameter. You can then rotate the Data Wheel to change the Output Level of the
second Chorus circuit.
4. This is the Pan position of the second Chorus circuit in the Dual Chorus effect. The number four icon is indicating that you must press the
number four button to access the Pan B parameter. You can then rotate the Data Wheel to change the Pan position of the second Chorus
circuit.
5. There are 5 pages of parameters associated with the Chorus, and you are currently on the fifth page. There are no more parameters
associated with the Chorus effect. Pressing the Next Page button will return to the first page.
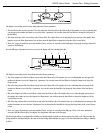
Like the Preamp effects, every Digital effect includes user defaults which can hold your favorite settings for quick recall. The procedure for
storing defaults to the Digital effects is the same as for the Preamp effects defaults. See page 21 for more information on storing a default to
an effect.
OutA PanA OutB PanB
4
FACTORY USER
%kHz
msdB
100
1
CHANGEDLINK
%kHz
msdB
2
CHANGEDLINK
%kHz
msdB
100
3
LINK
%kHz
msdB
r99
4
LINK
PAGE
5
OF
5
COMP WAH TUBE EQ
L/R OUTS
DIGITAL
CLIP
#
b
GATE
SEAMLESS
BANK
EQDIST
12
2
L99
3
5
4
DlyA DlyB Balance
4
FACTORY USER
%kHz
msdB
50
1
CHANGEDLINK
%kHz
msdB
2
CHANGEDLINK
%kHz
msdB
100
3
LINK
%kHz
msdB
0
4
LINK
PAGE
4
OF
5
COMP WAH TUBE EQ
L/R OUTS
DIGITAL
CLIP
#
b
GATE
SEAMLESS
BANK
EQDIST
12
2
3
27
RP21D User’s Guide Section Two - Editing Functions