


Master Mix
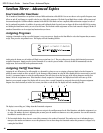
The Master Mix is found at the end of editing your Digital Effects. After you have edited the last Digital Effect module in your configuration,
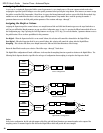
press the Effects button again. The Display will look something like this:
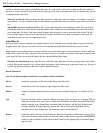
The Display is now telling you four things about the Master Mix.
1. This is the Dry Level present at the output of the Digital Section. The Dry signal is the raw Preamp signal absent of Digital Effects. The
number three icon is indicating that you must press the number three button in order to access the Dry level Parameter. You can then
rotate the Data Wheel to change to level of the Dry signal present in the mix.
2. This is the Wet Level present at the output of the Digital Section. The Wet signal is the Preamp signal after it has been processed through
the Digital Effects. The number four icon is indicating that you must press the number four button in order to access the Wet level
parameter. You can then rotate the Data Wheel to change the level of the Wet signal present in the mix.
3. This is telling you that there are two pages of parameters associated with the Master Mix, and that you are currently on the first page.
Press the Next Page button to access page two.
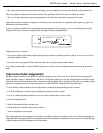
Cabinet Emulator
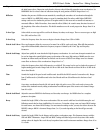
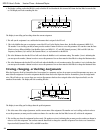
Page two of the Master Mix Section provides access to the Cabinet Emulator parameters. Once you have accessed this page, the display will
look something like this:
The Display is now telling you four things about the Cabinet Emulator.
1. This parameter will turn the Cabinet Emulator on or off within the currently active Program. The number one icon is indicating that you
must press the number one button in order to access the on/off parameter. You can then rotate the Data Wheel to change the status of the
Cabinet Emulator for you Program.
2. This is the Cabinet Type. Each type will provide different tonal response to the Program. The number two icon is indicating that you must
press the number two button in order to access the Cabinet type parameter. You can then rotate the Data Wheel to change the type of
cabinet being used.
3. This parameter selects whether the Cabinet Emulator will be placed before or after the Digital section. The number four icon is indicating
that you must press the number four button to access the Cabinet Emulator placement parameter. You can then rotate the Data Wheel to
change between pre or post digital.
4. This section of the display is telling that there are two pages of parameters and that you are on the second page. There are no more pages
to display.
CabEm:Type Pre Digital
4
FACTORY USER
%kHz
msdB
byp
1
CHANGEDLINK
%kHz
msdB
2
CHANGEDLINK
%kHz
msdB
Pre
3
LINK
%kHz
msdB
7
4
LINK
PAGE
2
OF
2
COMP WAH TUBE EQ
L/R OUTS
DIGITAL
CLIP
#
b
GATE
SEAMLESS
BANK
EQDIST
1
2
2
4
3
Master Mix: Dry Wet
4
FACTORY USER
%kHz
msdB
50
1
CHANGEDLINK
%kHz
msdB
2
CHANGEDLINK
%kHz
msdB
40
3
LINK
%kHz
msdB
60
4
LINK
PAGE
1
OF
2
COMP WAH TUBE EQ
L/R OUTS
DIGITAL
CLIP
#
b
GATE
SEAMLESS
BANK
EQDIST
1
2
2
3
46
RP21D User’s Guide Section Two - Editing Functions