


00:00:01
Play
TRK005
En.12
ENGLISH
Replaying Tracks
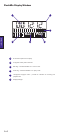
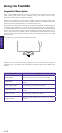
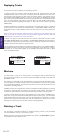
Track Replay Display
A recorded track may be replayed for auditioning purposes.
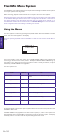
To replay the last track recorded, press the PLAY button (H). The PLAY flag on the LCD
display illuminates. After a brief pause, the display shows the elapsed time of the track.
The bargraph meter will show the level of the track being replayed. The playback may be
monitored via the PHONES connector. At the end of the track, the FlashMic will resume
IDLE mode. Pressing the M/STOP button during replay will also return the FlashMic to IDLE
mode. To pause playback during play, press PLAY again. The LCD display will show PAUSE.
Play can be resumed by pressing PLAY again, or stop mode can be entered by pressing
‘MENU/STOP.
A LONG UP TURN on the jogswitch will “fast-forward” the track (FFW mode), to enable a
particular section of the track to be located. Similarly, a LONG DOWN TURN “rewinds” the
track (REW mode). The time display continues to show the track time during these ‘fast’
modes.
Note, if marker points have been added to the track, jogswitch turns will instead ‘jump’ the
replay to the next or previous marker point (depending on jogswitch direction). (See the
following section on ‘Markers’ for more information.)
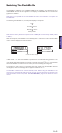
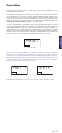
To select and replay a track other than the last recorded, decrement the track number
with SHORT DOWN TURNs on the jogswitch. (A LONG DOWN TURN will decrement faster.)
UP TURNs will similarly increment the track number. When the required track number is
displayed, press the PLAY button to replay the track.
It is also possible to select a different track while remaining in PLAY mode; SHORT TURNs of
the jogswitch will skip to the next or previous track, depending on the direction of rotation.
Be careful not to make LONG TURNs, as the FlashMic will instead enter FFW or REW
mode, as described above.
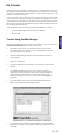
Select Track Display
Markers
It is often useful to mark one (or more) points in a recording for ease of reference during
later production and editing. You can add markers to FlashMic recordings in both REC and
PLAYBACK modes..
The markers are ‘data flags’, which are embedded in the sound file at the appropriate point.
They will appear as onscreen markers when the downloaded sound files are later loaded
into a sound editing package. The markers are written to the sound file with both linear and
compressed recording formats.
FlashMic markers are recognised by a number of professional editing applications, including
Cool Edit Pro, Adobe Audition, Sound Forge V4 and above. Note however, that editors can
currently only read markers in sound files recorded using the linear recording modes.
A marker is added whilst recording or during playback by a short press on the REC button.
(Note that a long press activates the REC LOCK function in REC mode). The LCD display
briefly displays MARKED. As the marker is purely a data flag within the sound file, no further
indication of its presence will be apparent until the resulting file is loaded into an editor
(although the marker points can be used as locators during playback).
Deleting a Track
If an erroneous or otherwise unwanted or unusable recording is made, it may be deleted
from the FlashMic’s memory to save memory space.
Deletion of tracks is performed via the FlashMic menu system. See Delete Menu, page 21
for full details on how to delete a track.