


!
En.33
ENGLISH
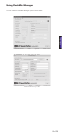
Creating a New Configuration File
To create a different preset (or presets), you must first create a new configuration file.
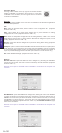
Click File>New (or enter CTL + N). This clears all the data entry fields and
enters ‘New’ as the Current Configuration file name.
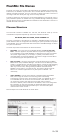
Enter data for the first preset (Preset 1) in all data entry boxes in the Current
Config file, Preset Configuration and DRM Configuration areas of the window. Note
that all these fields are mandatory. The File Name in the BWF/MPEG File Info area
is also mandatory, but Company Name, Reporter Name and Description are
optional and may be left empty if wished. Note that only the characters A-Z and 0-9
are allowed in the File Name field.
Click the SAVE button (or click File>Save, or enter CTL + S). The Save File
As dialogue box opens. Enter a name for the configuration file in the File name box
and click Save. The dialogue box dismisses. In the FlashMic Manager window, note
the Current Configuration file name is now the name just entered.
If you want to create further presets within this configuration file, select a new
number in the Select Preset drop-down box (it is normal, though not essential, to
work in numerical order!), which clears all the data entry boxes. Enter the data for
the new presets in turn, as before. Note that two options in the DRM Configuration
area of the window - Battery and Enable Configuration changes in DRM – retain
the selection that was made when creating the initial preset. This is because these
two parameters are ‘global’, and apply to all the presets in the configuration file.
On SAVEing, the configuration file already created will be updated with the
additional presets. It is then possible to upload this configuration file. See
Uploading a Configuration File to the FlashMic.
•
•
•
•
•
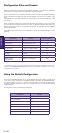
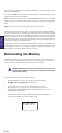
Modifying an Existing Configuration File
You may wish to change an existing configuration file in some way, or possibly use an
existing file as a starting point for a different one. Any parameters in one or more presets
may be changed.
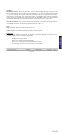
Click File>Open (or enter CTL + O). The Select file to Open/Load dialogue box
opens.
The available configuration files (*.cfg) will be listed. Select the file to be used, and
click Open. This dismisses the dialogue box, and FlashMic Manager will now be
loaded with the file. The filename appears as the Current Configuration file in the
window’s top area.
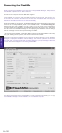
The data for Preset 1 is displayed. Either modify the parameters for this preset, or
select a different preset for modification.
After all necessary changes have been made to the chosen preset, click SAVE
if you don’t want to keep the original set of preset parameters (i.e. in the
configuration file you opened). The set of presets will be saved as a configuration
file with the same name. If you want to create a new configuration file from the
altered presets, click File>Save As, and enter a new name in the Save File As
dialogue box which opens. Click Save.
If you attempt to open a different preset before saving the changes to the current
one a warning will open, prompting you to save the changes first.
•
•
•
•
•
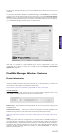
Creating a Personalised Defaults File
You may wish to modify the Defaults.cfg file to include parameter values specific to your
operation. In this way, when Presets>Set Default Values is selected, your own personalised
settings are loaded into the FlashMic Manager data fields.
Refer to Modifying an Existing Configuration File and open Defaults.cfg.
Modify the data as desired in Preset 1, then Save to the existing Defaults.cfg file name.
When modifying Defaults.cfg do not change the Preset Custom Name from PSET_1.