


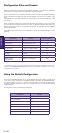


Setting Pre-record Buffer Time
En.34
ENGLISH
Uploading a Configuration File to the FlashMic
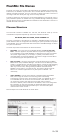
After modifying or creating a configuration file, you will want to load it into the FlashMic. This
can be carried out immediately after editing the configuration file.
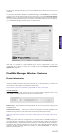
Launch FlashMic Manager, if not already open.
Switch the FlashMic on.
When the FlashMic is in IDLE mode, connect it to the computer with the
USB cable supplied.
The LCD display will show USB, and the large red indicator in the FlashMic Manager
window will turn green. There should also be some audible and/or visual
confirmation on the computer that the FlashMic has been ‘recognised’. (Exactly
what form this confirmation takes may vary slightly from computer to
computer. Ignore any window called DRM85 that may open.) FlashMic Manager
will display the parameter values of the FlashMic’s currently selected preset.
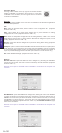
On FlashMic Manager, click File>Open (or enter CTL + O), and select the
configuration file that you wish to load into the FlashMic.
Click the button Send this configuration file to DRM. A message window will open
after a short delay, confirming that the configuration file has been transferred.
Unmount the FlashMic and unplug the USB connector. The FlashMic reverts to
IDLE mode. Any of the new presets making up the configuration file just loaded may
now be used by recalling it using the Preset Menu. See Preset Menu, page 17 for
more details.
•
•
•
•
•
•
•
!
Do not edit the .cfg files in any text editor on a PC or MAC as the text capitalisation or the
syntax may be corrupted, and the preset files will not work correctly.
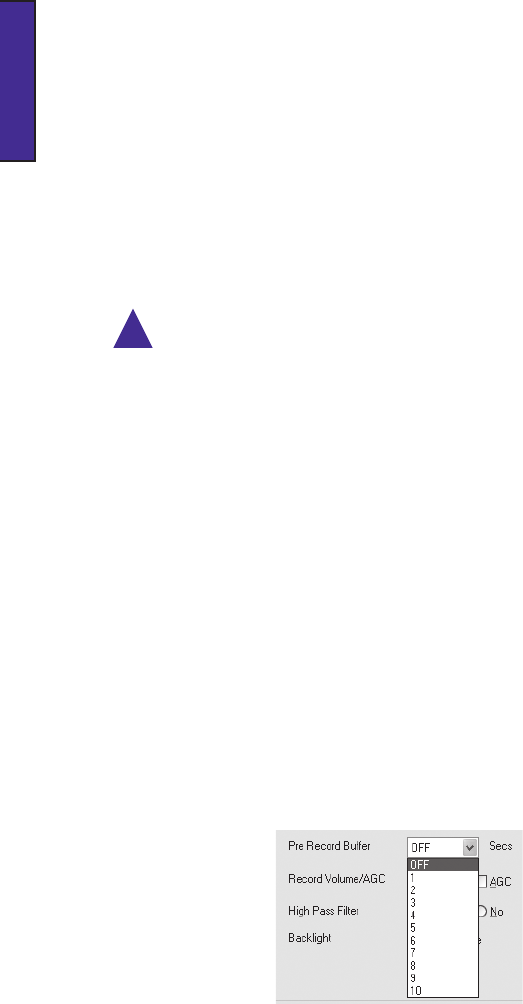
PreRecord Buffer
The FlashMic incorporates a pre-record buffer of up to 10 seconds (adjustable).
When enabled, audio collected by the microphone is constantly being written into a buffer
memory – separate from the main memory – at all times as long as the FlashMic is powered.
Thus the last few seconds of audio are always already stored inside the FlashMic. When the
REC button is pressed, the contents of the buffer is written into the main memory, while the
‘live’ audio continues to be written into the buffer. When the M/STOP button is pressed, the
contents of the buffer continues to be written to the sound file, so nothing is lost.
When the recording is replayed, it will be found that it begins with a few seconds of audio
immediately before the REC button was pressed.
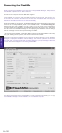
There are no controls on the FlashMic itself for the pre-record buffer; it is enabled and has
its duration set from the FlashMic Manager software, as part of a preset configuration. The
pre-record buffer can be set from 0 to 10 seconds, in one second increments.
It should be clear that if all sound files are created with 10 seconds of pre-record buffer
enabled, available memory will be used up more rapidly. A degree of experiment may be
necessary to find an optimum setting for the length of the pre-record buffer.
It is recommended that the buffer is deselected (by setting the duration to ‘OFF’ in FlashMic
Manager) for recording situations where it is unlikely to bring any benefit.